1 / 26
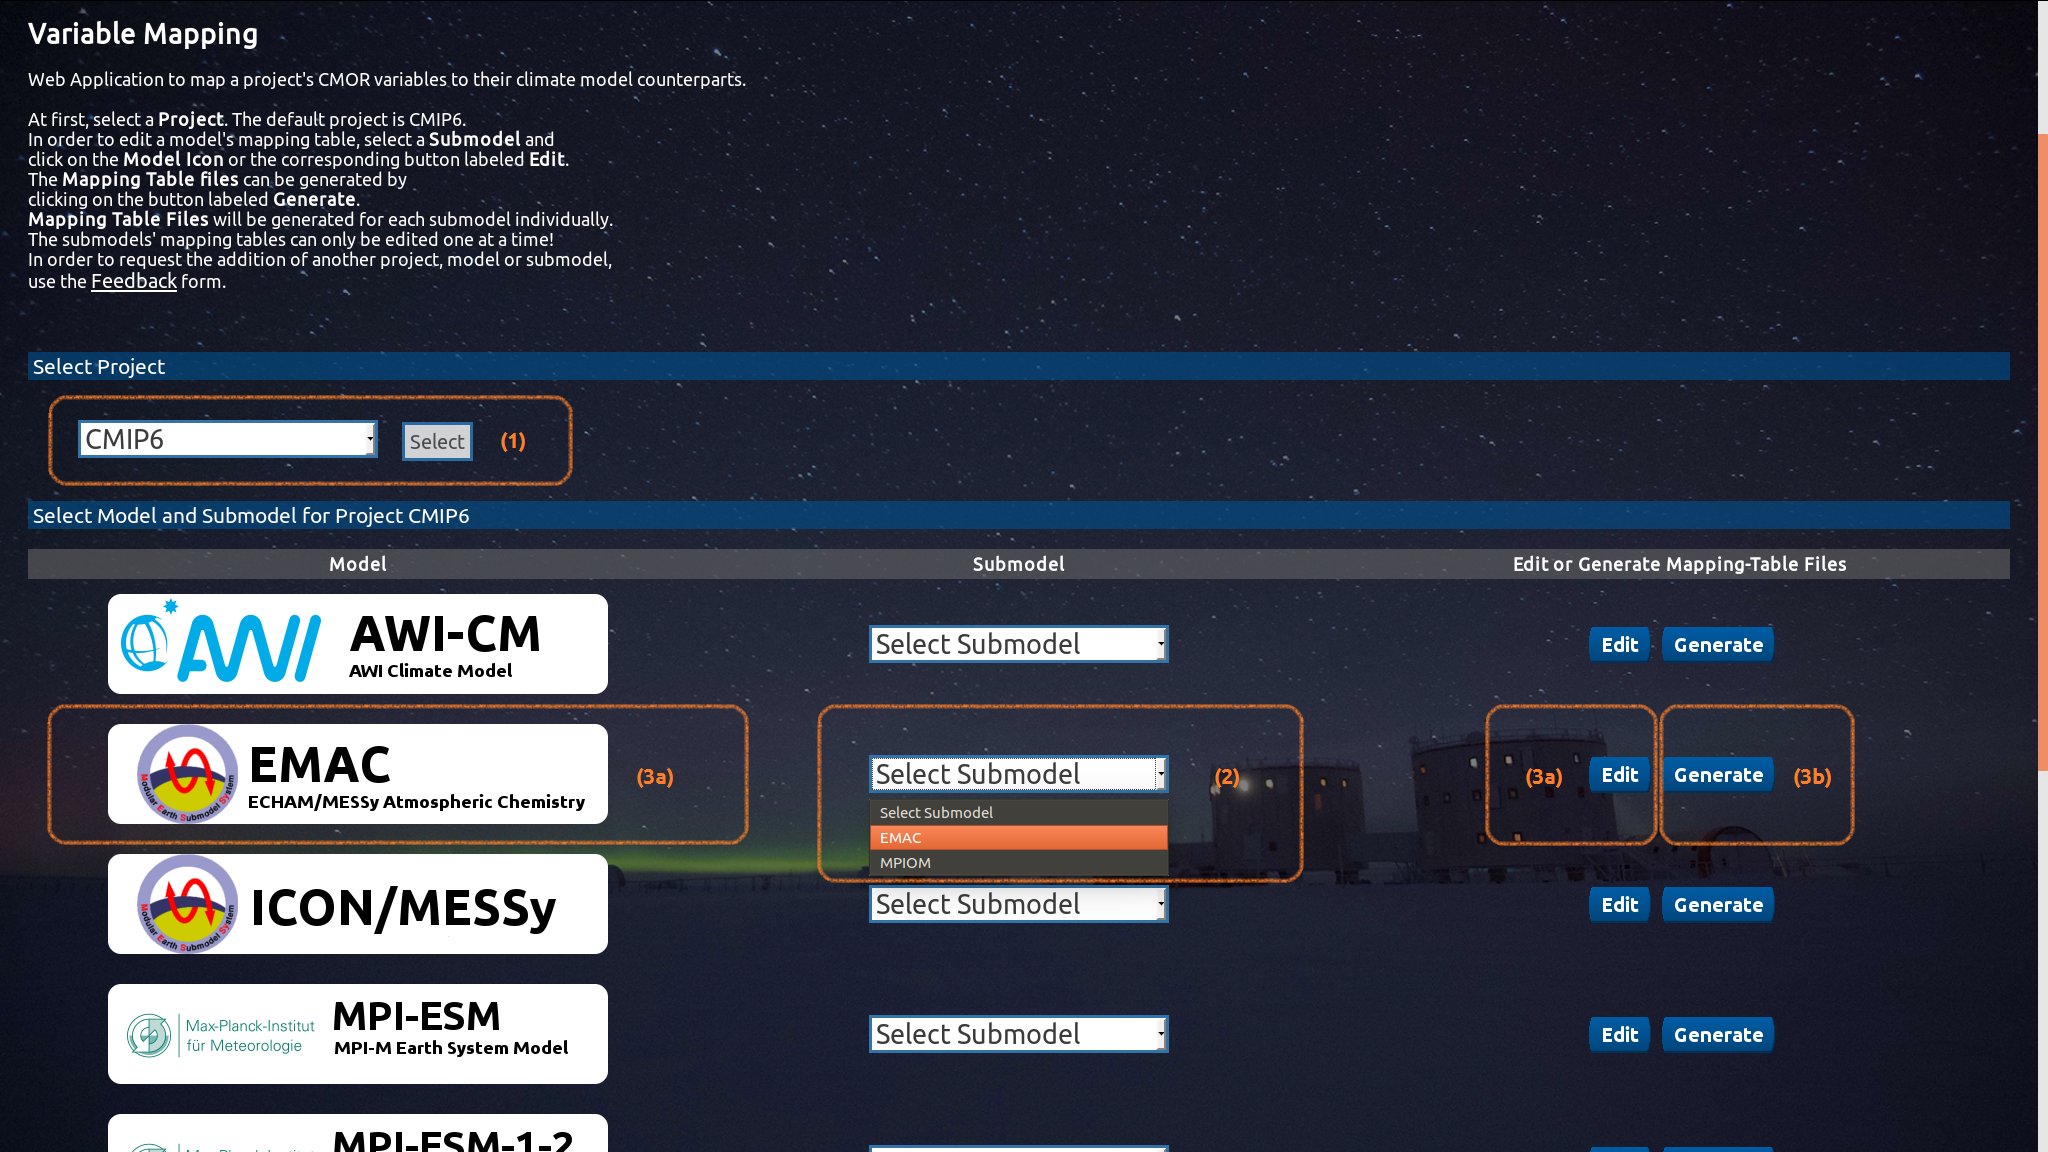
Under the 'Variable Mapping' tab, first Select a 'Project' (1), the default is 'CMIP6'. Having selected a submodel of your CM/ESM (2), you are provided with 2 options: (3a) Edit the 'Variable Mapping Information' of the selected CMs/ESMs submodel, or (3b) Generate mapping table files for your CMs/ESMs submodel.
2 / 26
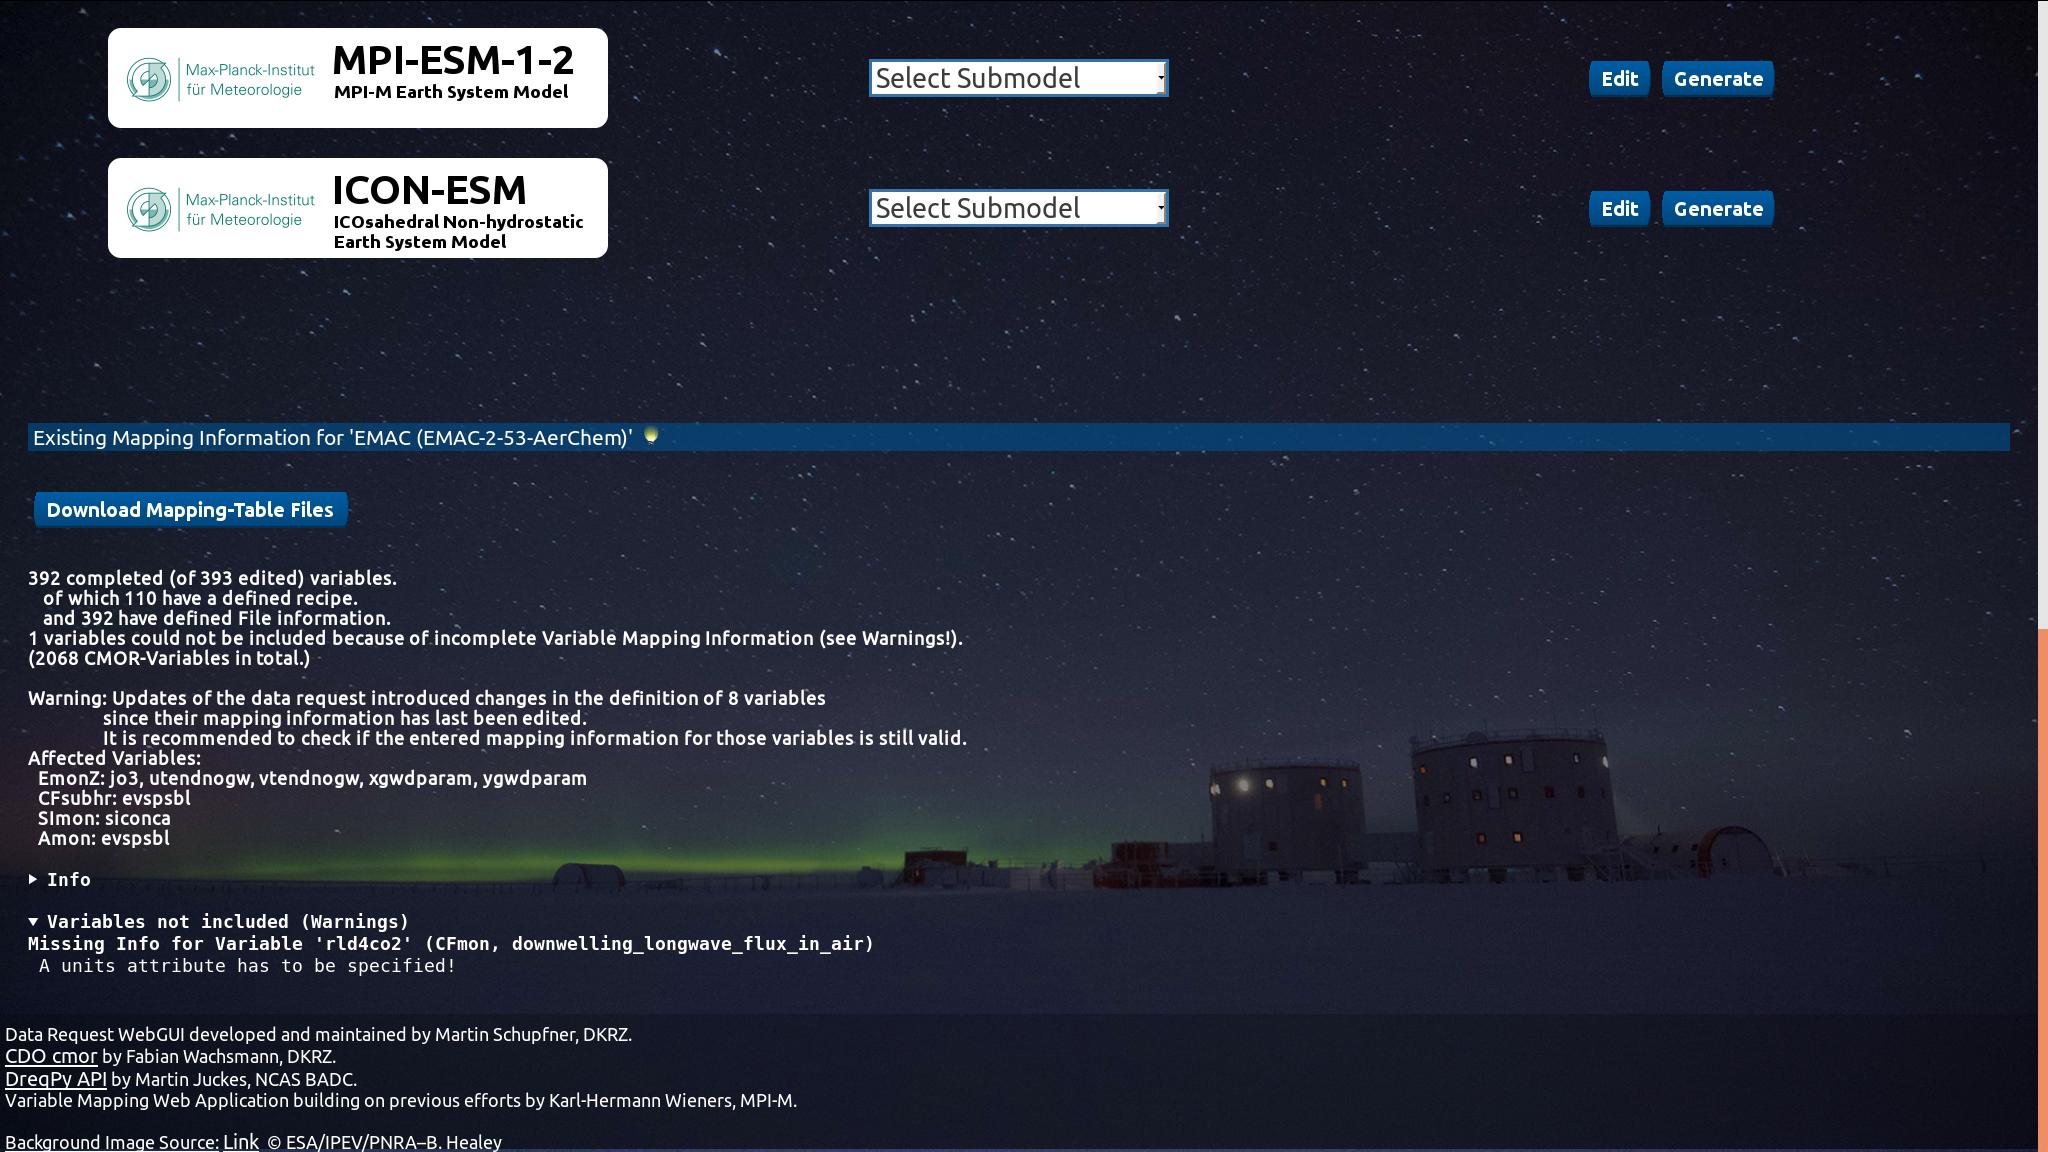
If you choose to generate mapping table files you will be provided with certain information (additionally to the download button): The number of variables edited and the number of variables included in the files. Further details about variables with mapping information yet missing ('Warnings') and illegible mapping information ('Errors') will be provided as well.
The files will be provided as both .json and .txt. The mapping tables serve as input for 'CDO cmor' and the recipe tables serve as input for the websites 'PostProcessing' functionality that creates postprocessing script fragments for diagnostic and standard conform rewrite of the data. 'Info' gives information about the used data request version and displays general errors.
The files will be provided as both .json and .txt. The mapping tables serve as input for 'CDO cmor' and the recipe tables serve as input for the websites 'PostProcessing' functionality that creates postprocessing script fragments for diagnostic and standard conform rewrite of the data. 'Info' gives information about the used data request version and displays general errors.
3 / 26
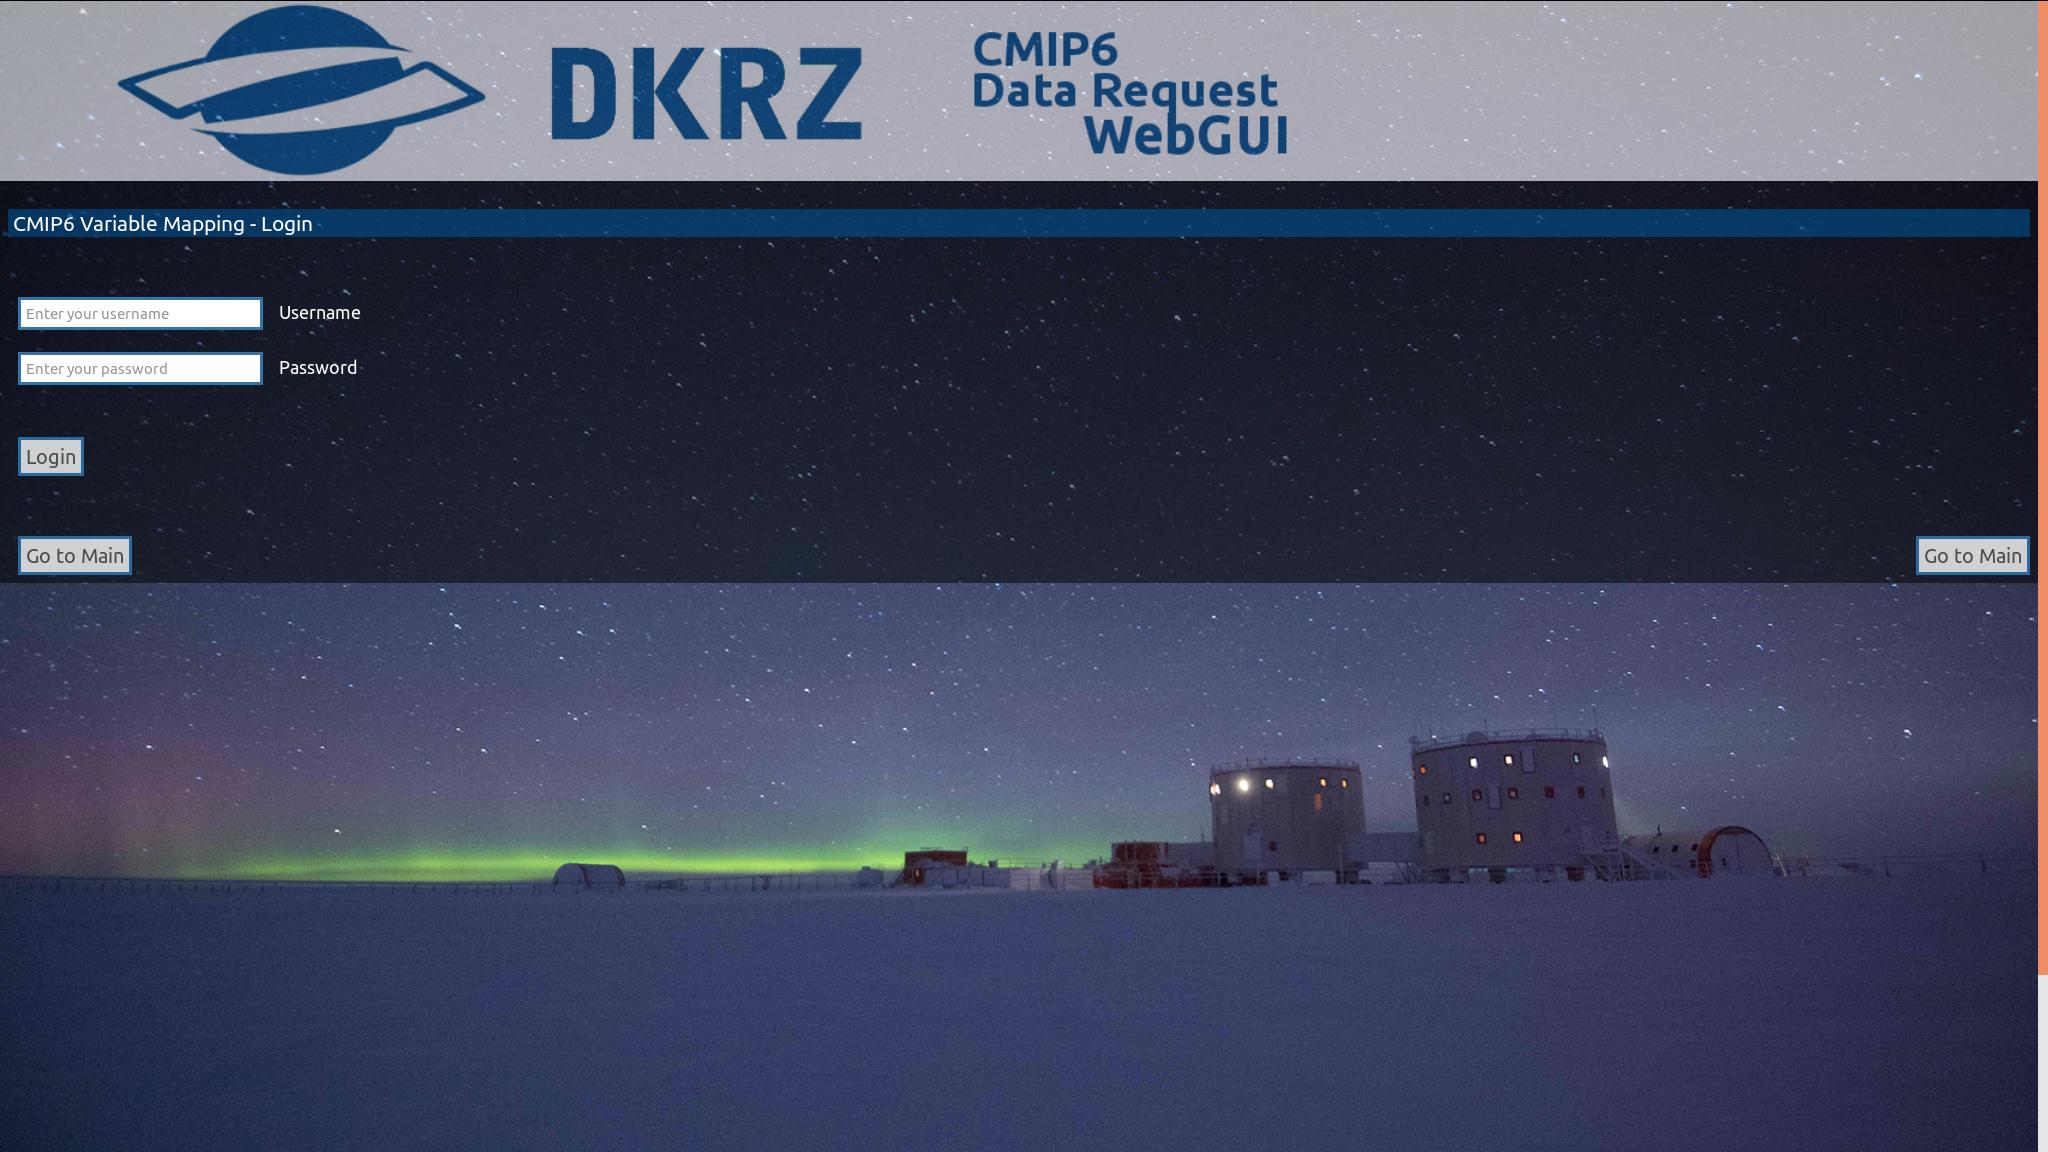
If you choose to edit the mapping information for your CMs/ESMs submodel you will be redirected to a common Login page. If you do not have an account contact the site admin, eg. via the 'Feedback' functionality.
4 / 26
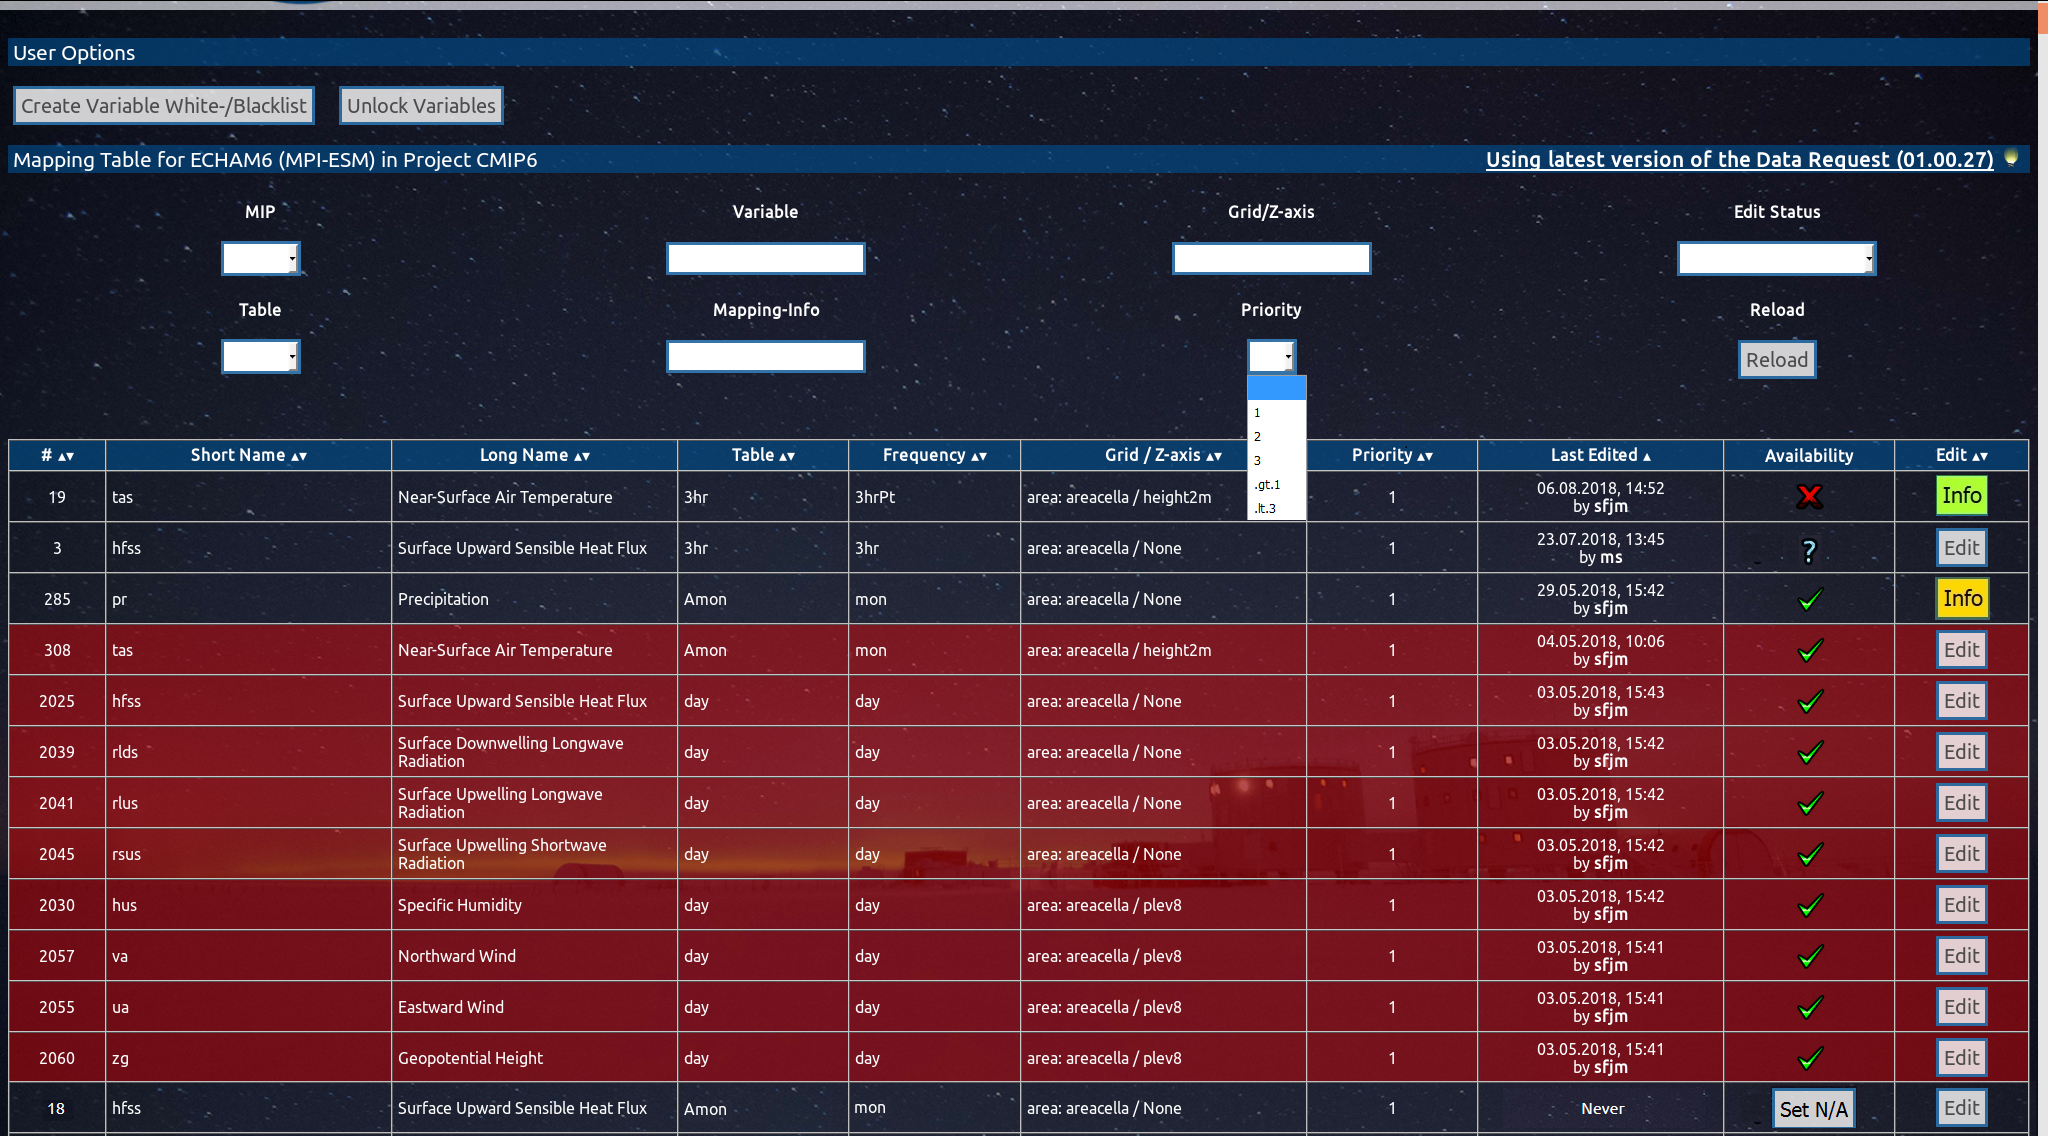
To fill in the mapping table you start with a 'Table View' of all ~2000 CMOR variables. Several filters (MIP, MIP Table, Grid, Variable, Priority, Edit Status, Mapping Info) and the sortable columns help to identify the variables you want to map to your model's variables. Hover over the filter labels or boxes (or in case of a select menu, their options) to display additional information on what the filter actually does.
5 / 26

The 'Edit Status' filters help to identify already edited variables with yet missing mapping information. A click on the 'Reload' button applies all selected filters. A click on the 'Edit' button of a certain row allows you to fill in your model's mapping information for this variable ('Edit View', see the next slide).
6 / 26
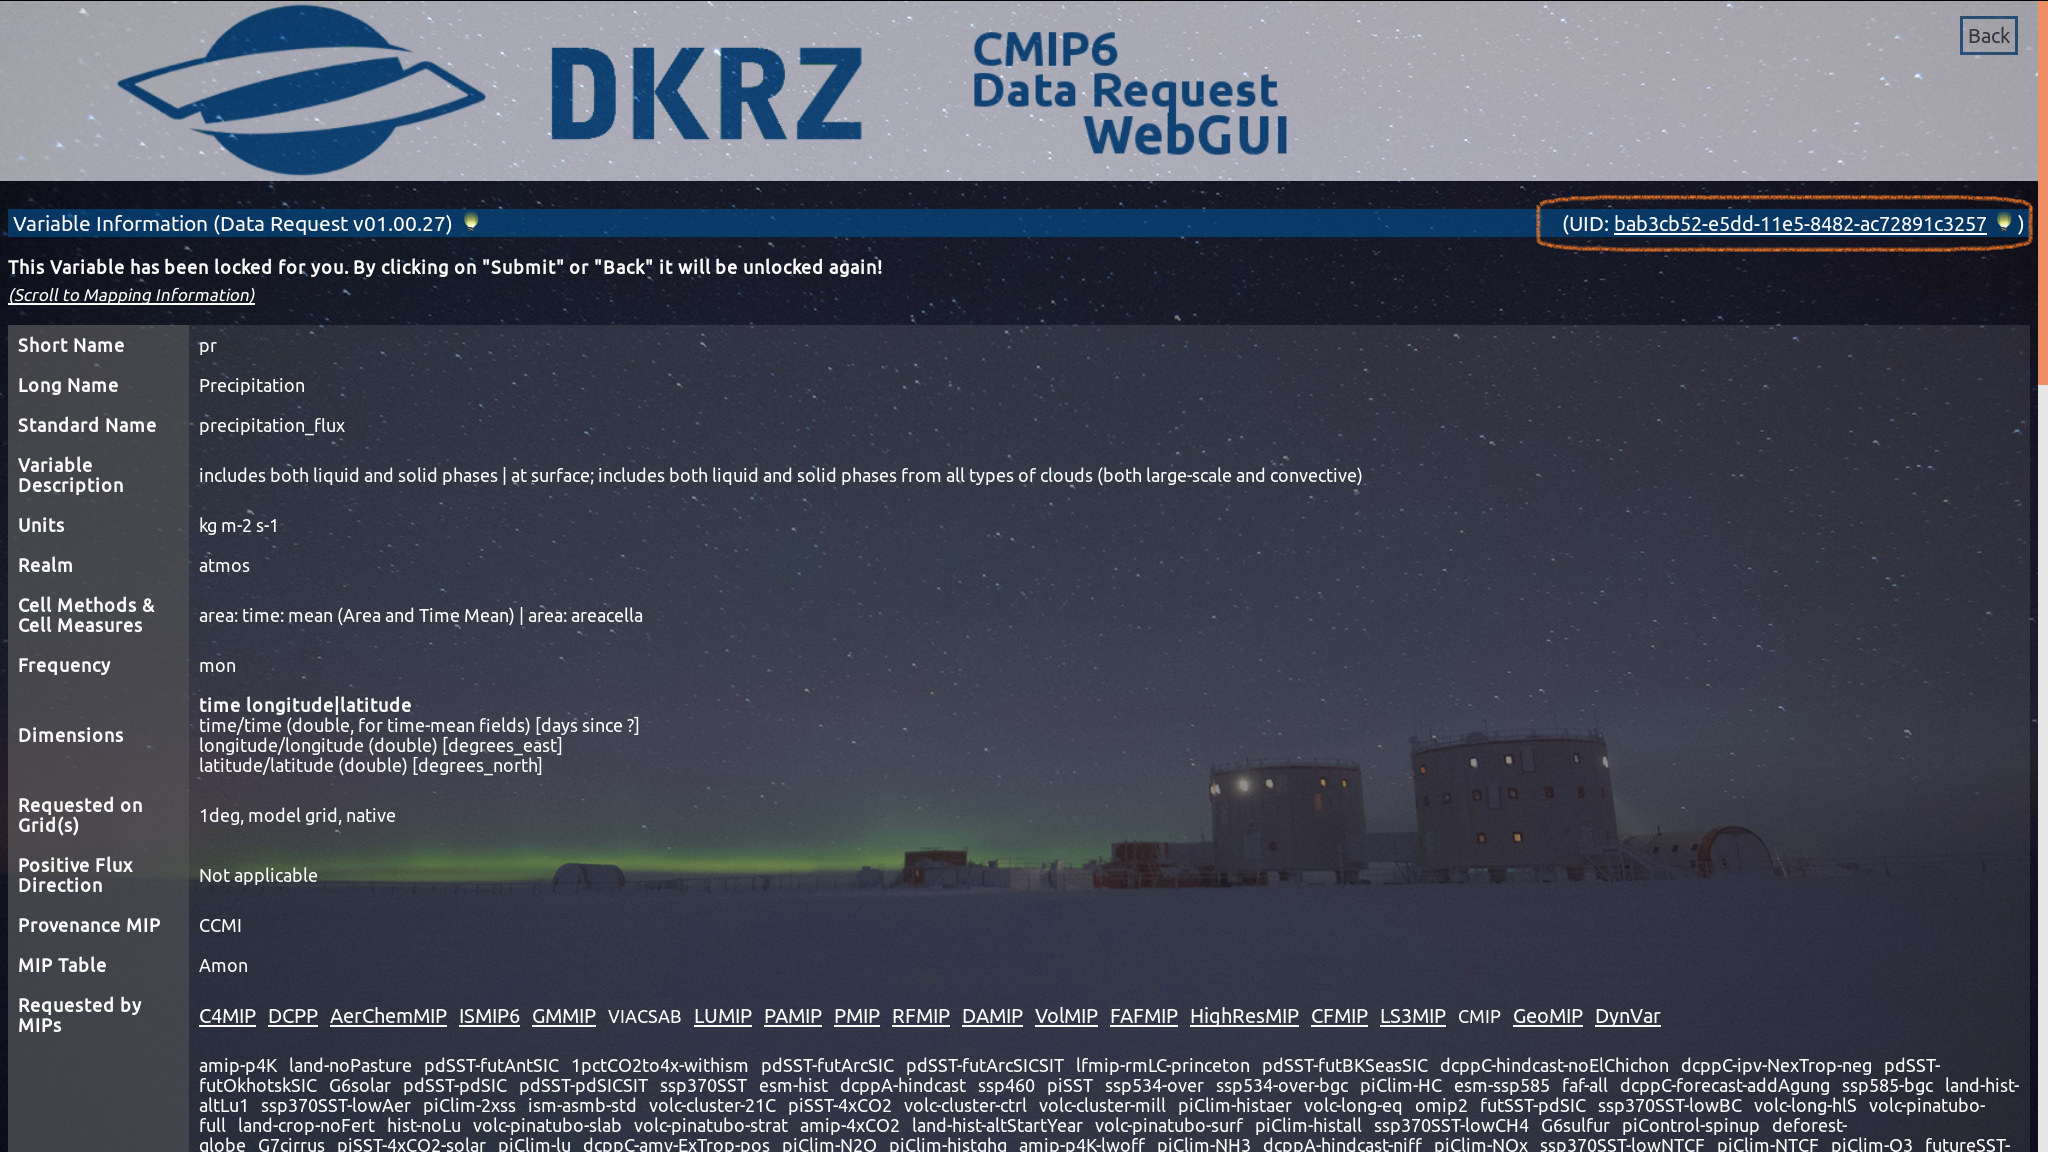
On the upper part of the site, all information of the selected CMOR variable is displayed, as it is provided by the 'DreqPy' tool of Martin Juckes. Furthermore, a link to the official variable site can be found in the upper right corner.
Note that this variable and all similar variables (yet unedited variables differing only in terms of cell methods, frequency or requested grid) have been locked for you, so no other user can edit them. To unlock: Use the 'Go Back' button or the 'Submit' button (explained later on).
Note that this variable and all similar variables (yet unedited variables differing only in terms of cell methods, frequency or requested grid) have been locked for you, so no other user can edit them. To unlock: Use the 'Go Back' button or the 'Submit' button (explained later on).
7 / 26
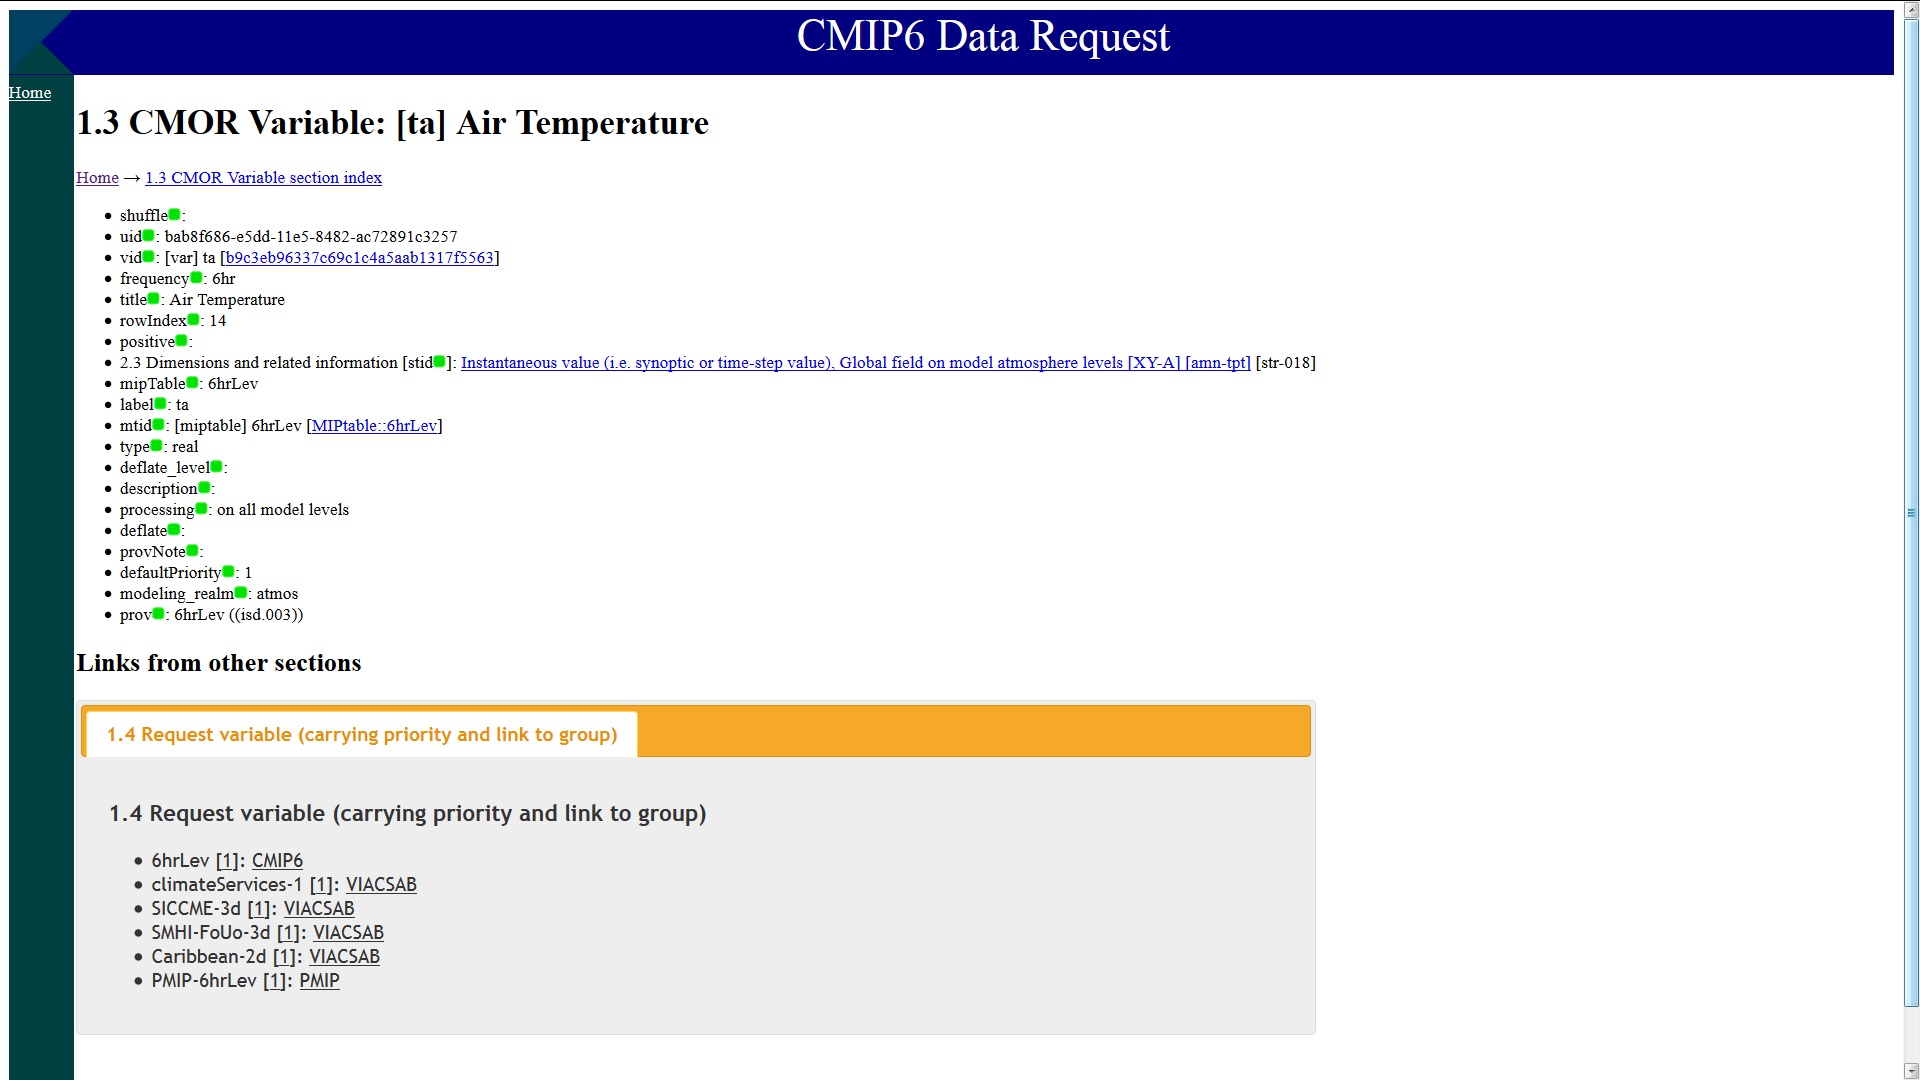
Example for an official CMOR variable description page. The page of an object contains links to objects of other sections it is linked to (MIP-tables, MIP-variable, etc.).
8 / 26
Updates of the CMIP6 data request and the underlying software may occure. This means that variables can be added, removed or their definitions (as shown in the 'Variable Information') may change. The 'Variable Definition Updates' show a history of the definition changes of the selected variable. If shown in RED, changes occured since this variable has been edited the last time! (Click to enlarge).
9 / 26
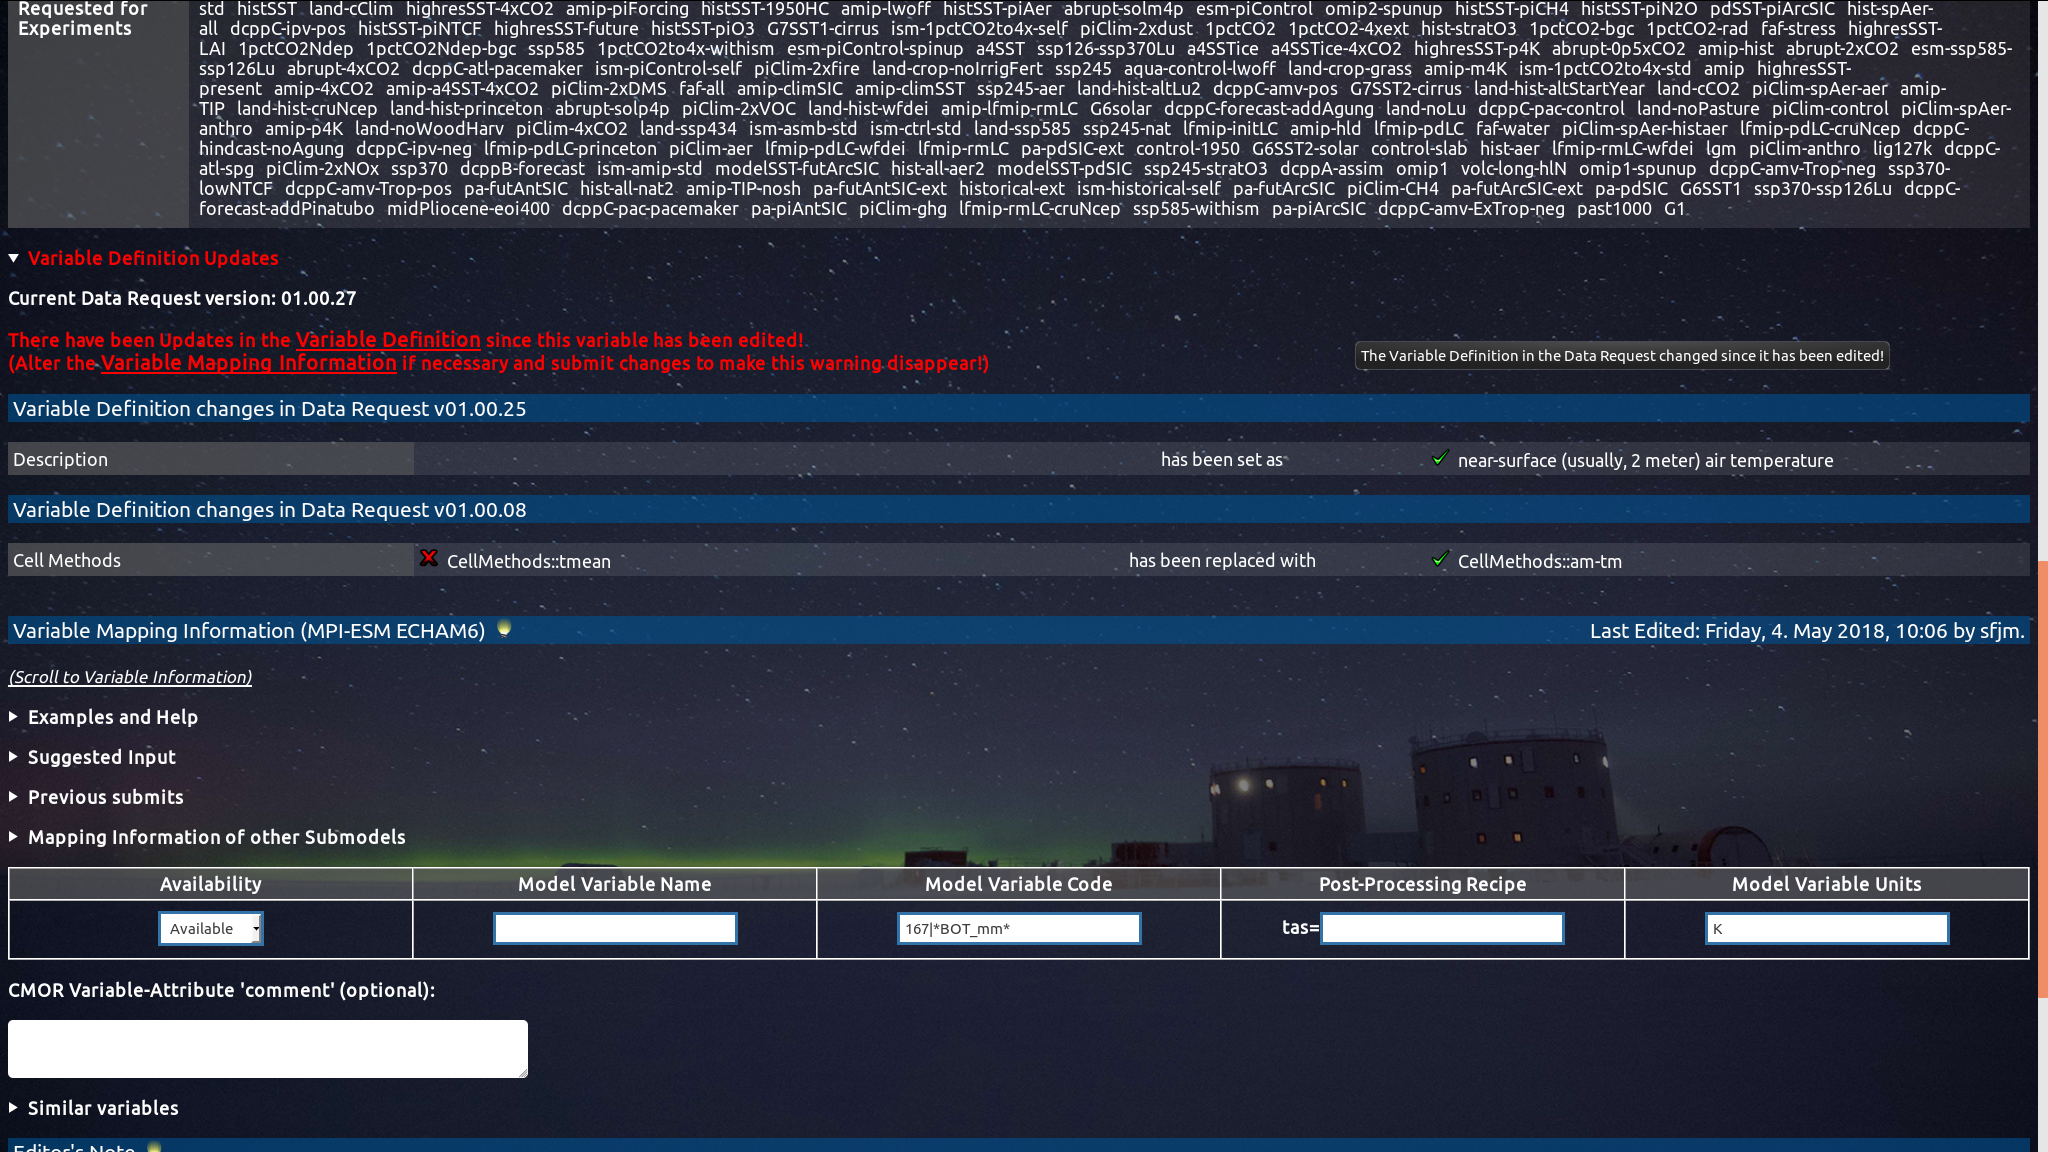
Enlarged view of 'Variable Definition Updates'. Only the main attributes are monitored for changes (Variable Description/Processing, ShortName/Label, LongName/Title, UniqueID, MIP Table, Frequency, Cell Methods, Units, Standard Name, Positive Flux Direction, Dimensions). If you notice changes that you consider as wrong for this variable, please use the 'Feedback' functionality to inform the site admin.
10 / 26
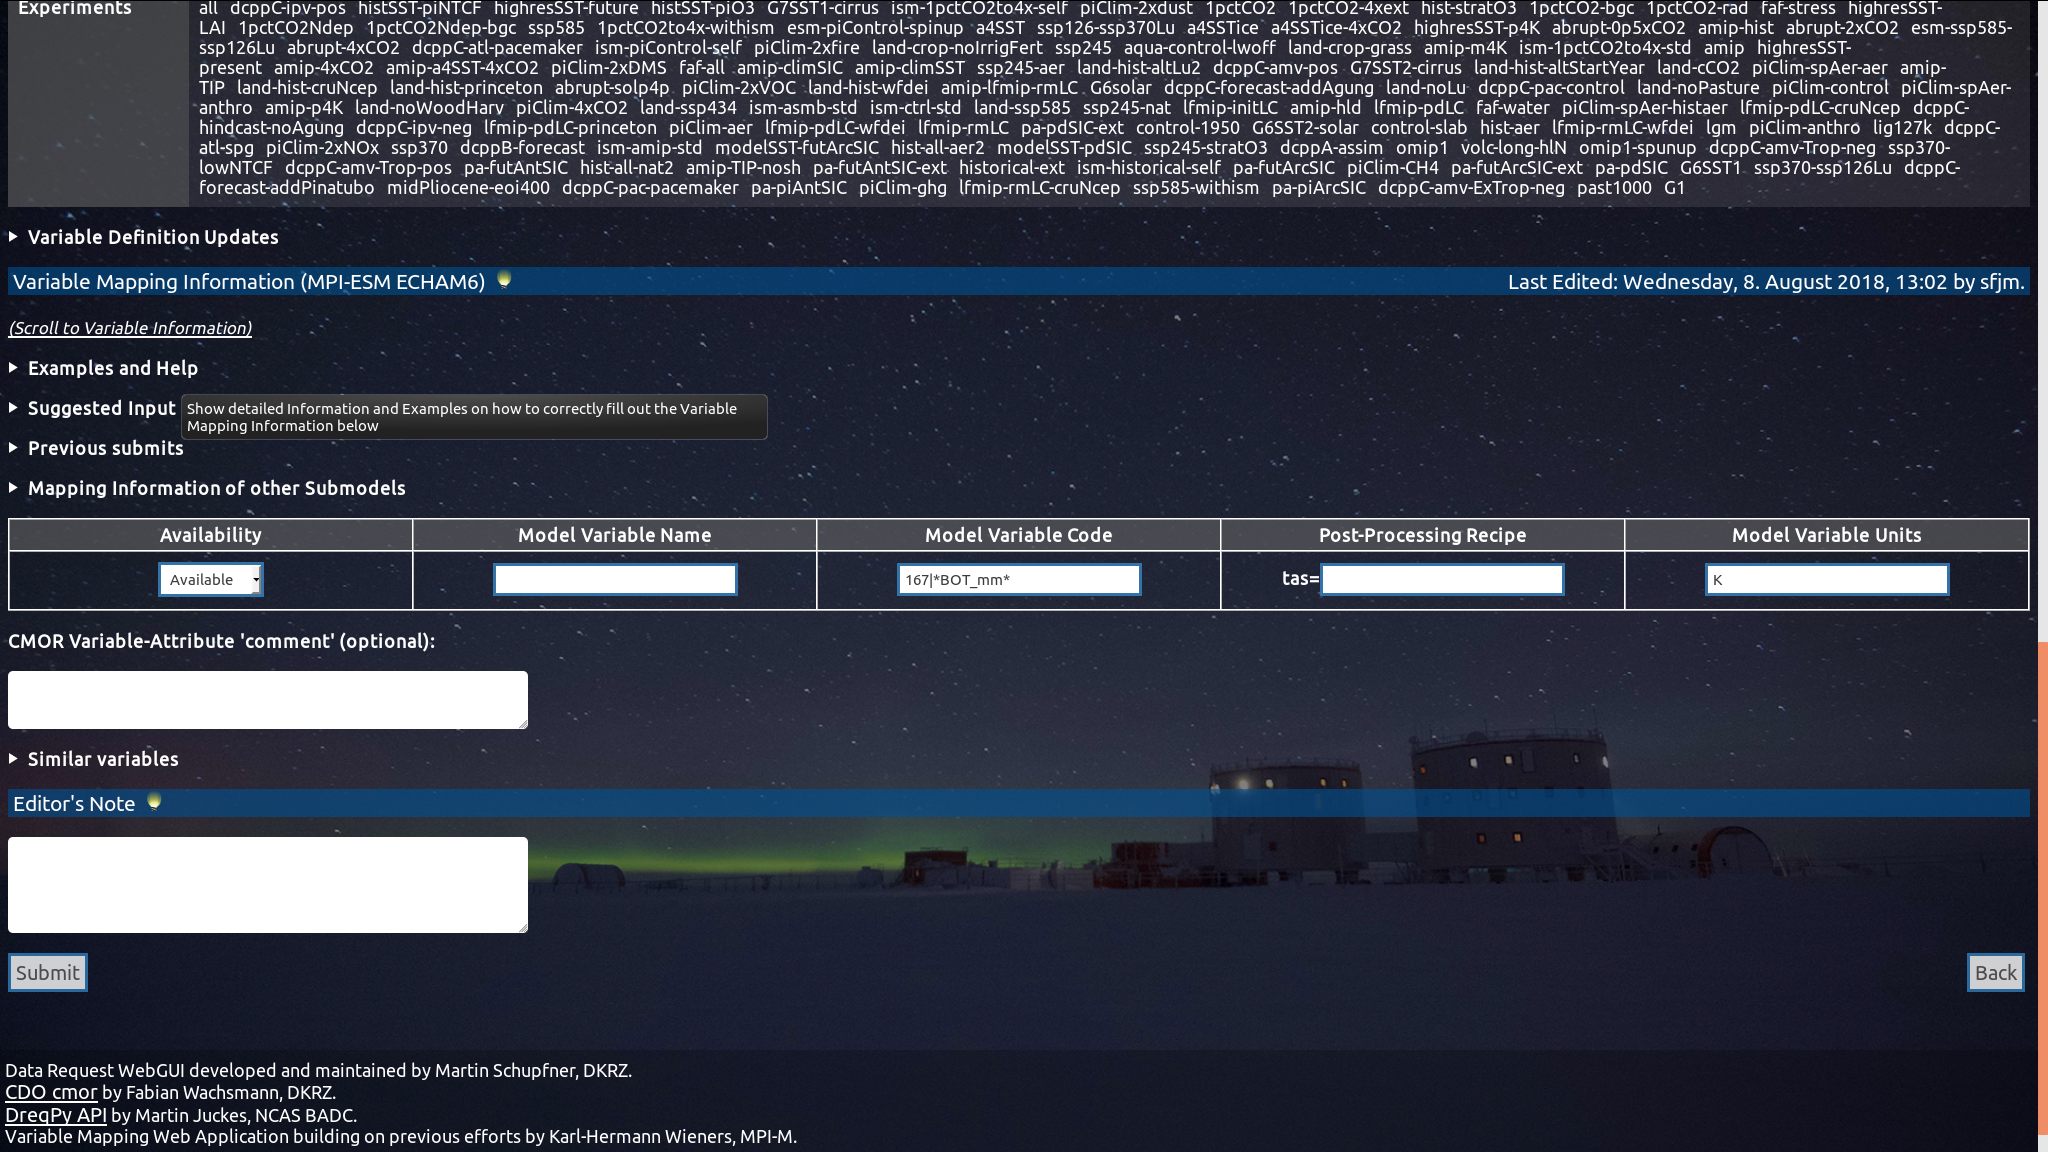
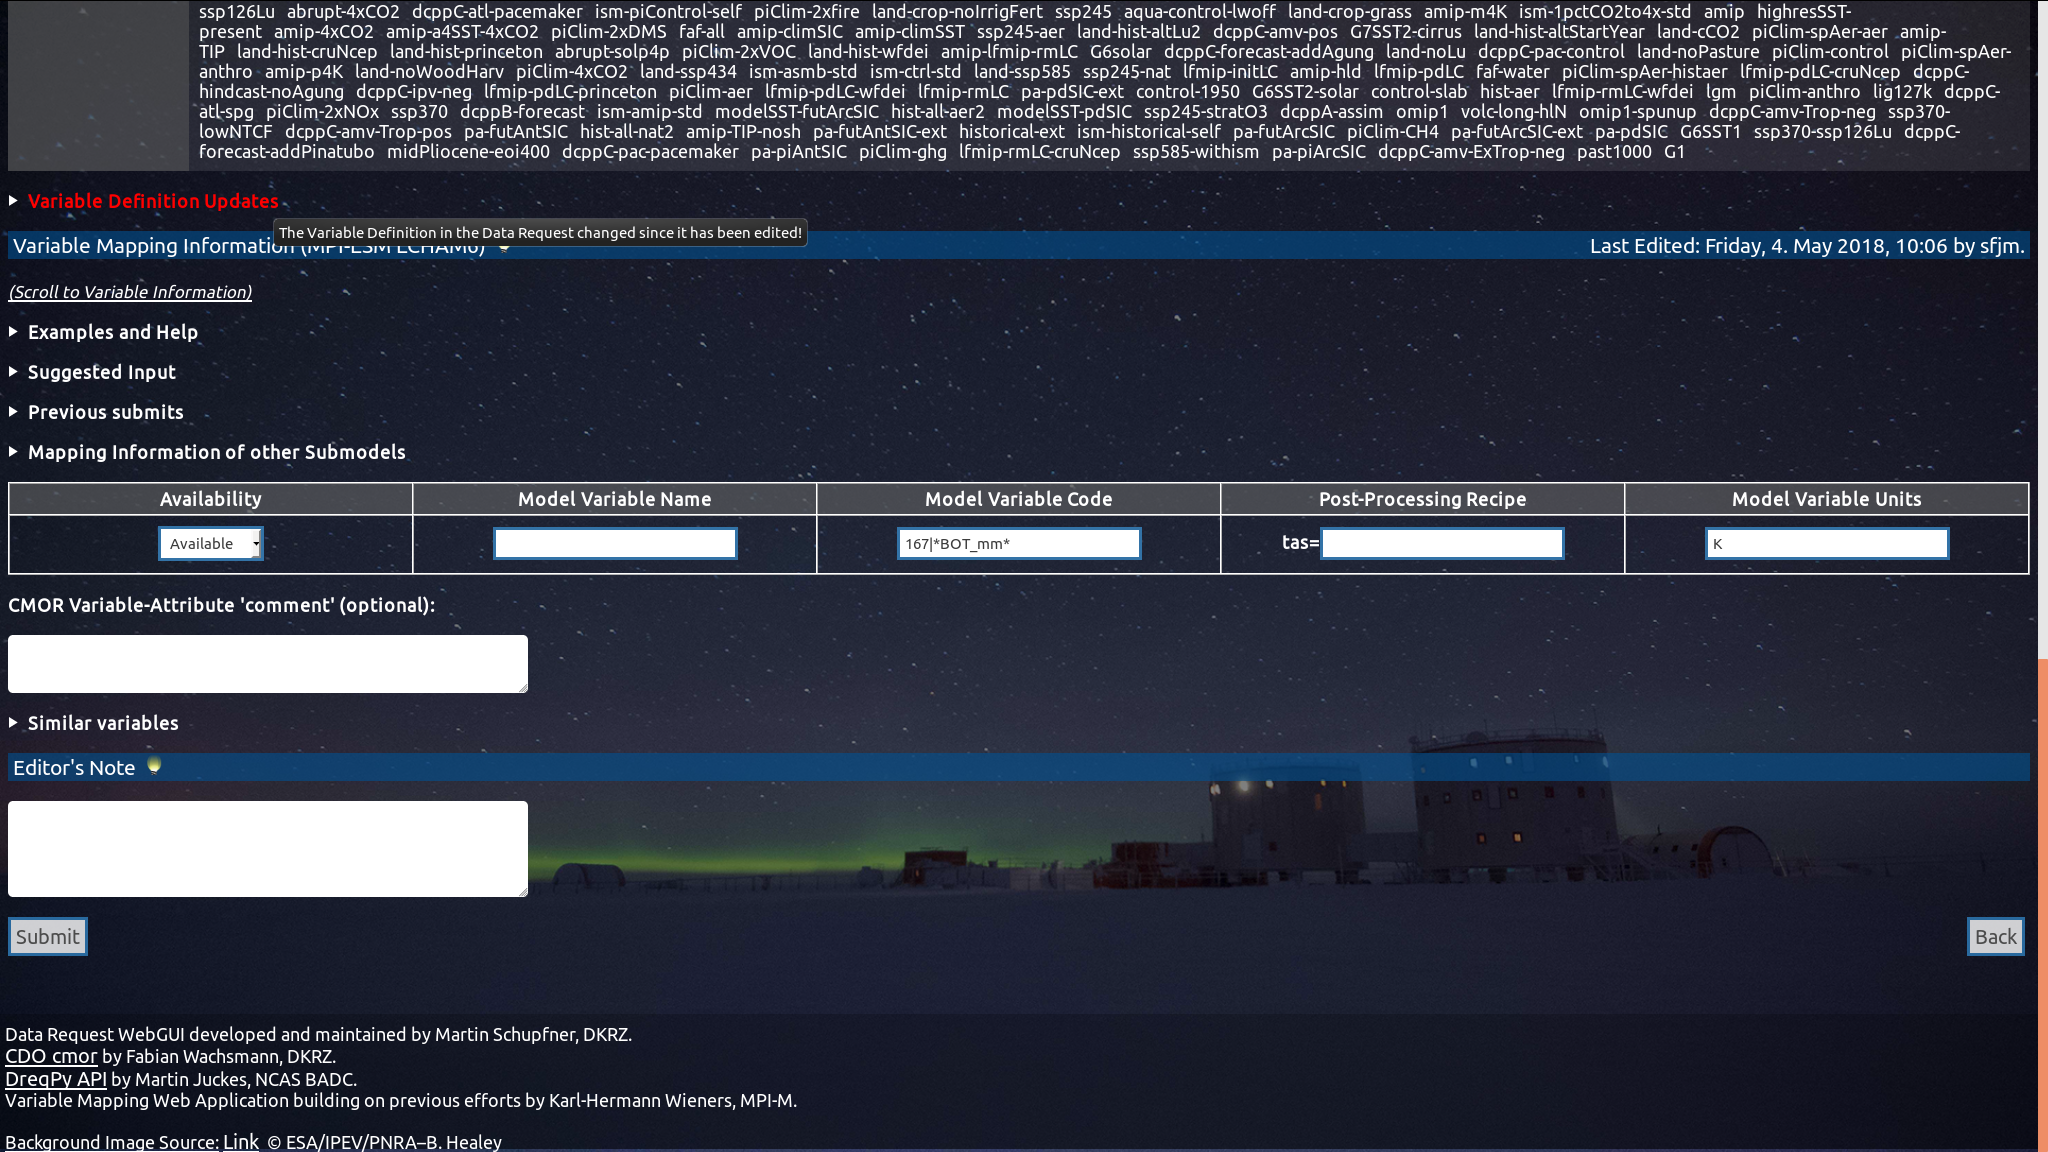
Your model's mapping information (which model variable represents the requested CMOR Variable), is filled in under 'Variable Mapping Information'. There are format requirements, on how your information has to be filled in. The 'Examples and Help' will guide you.
11 / 26
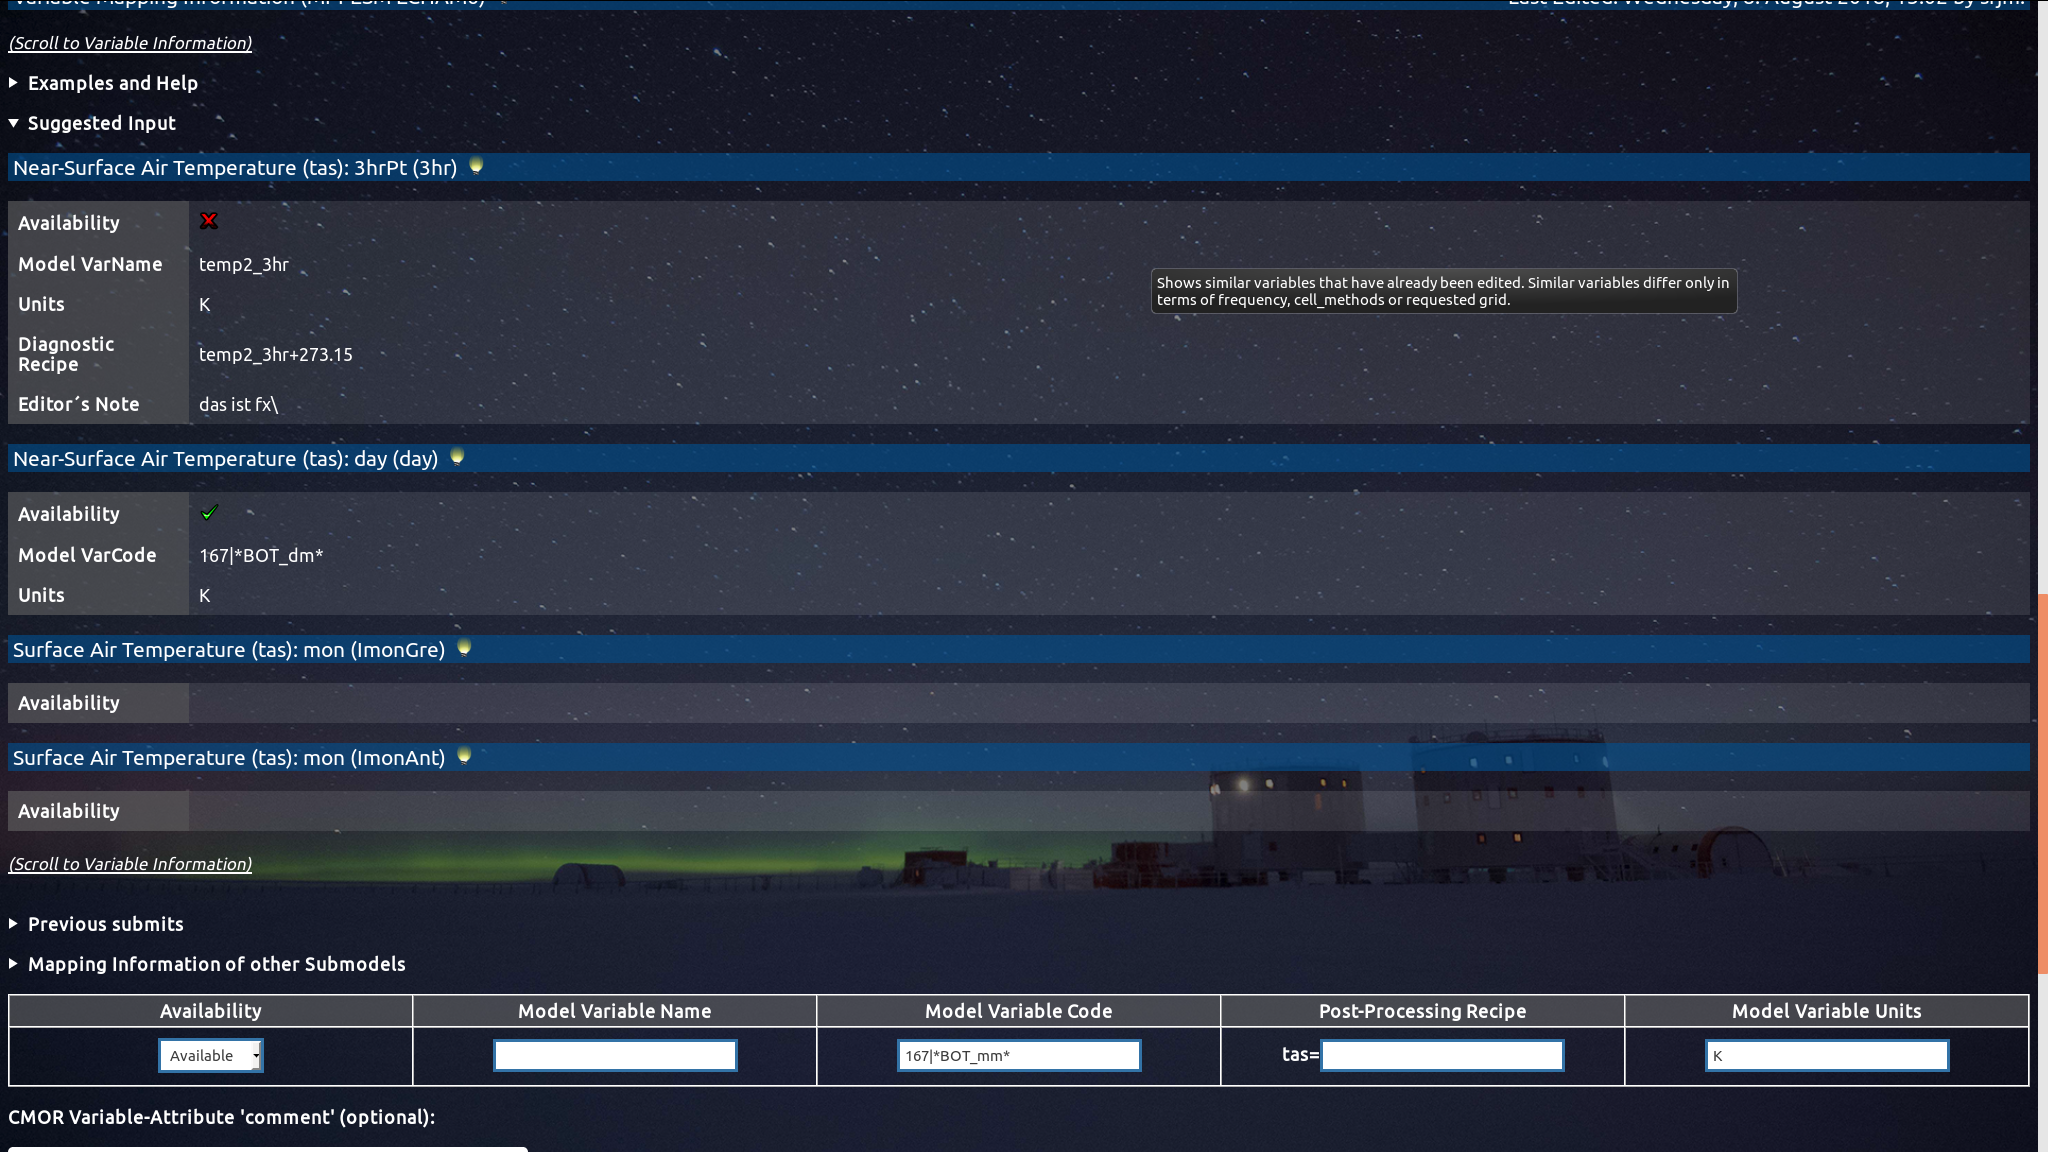
If you or someone else already filled in 'Variable Mapping Information' for similar variables, there will also be some 'Suggested Input'. In this example the CMOR variable is 'monthly air temperature at surface' and the stored mapping information for 3 hourly and 6 hourly surface air temperature are shown. You may copy & paste parts of the suggested input if wished/needed.
12 / 26
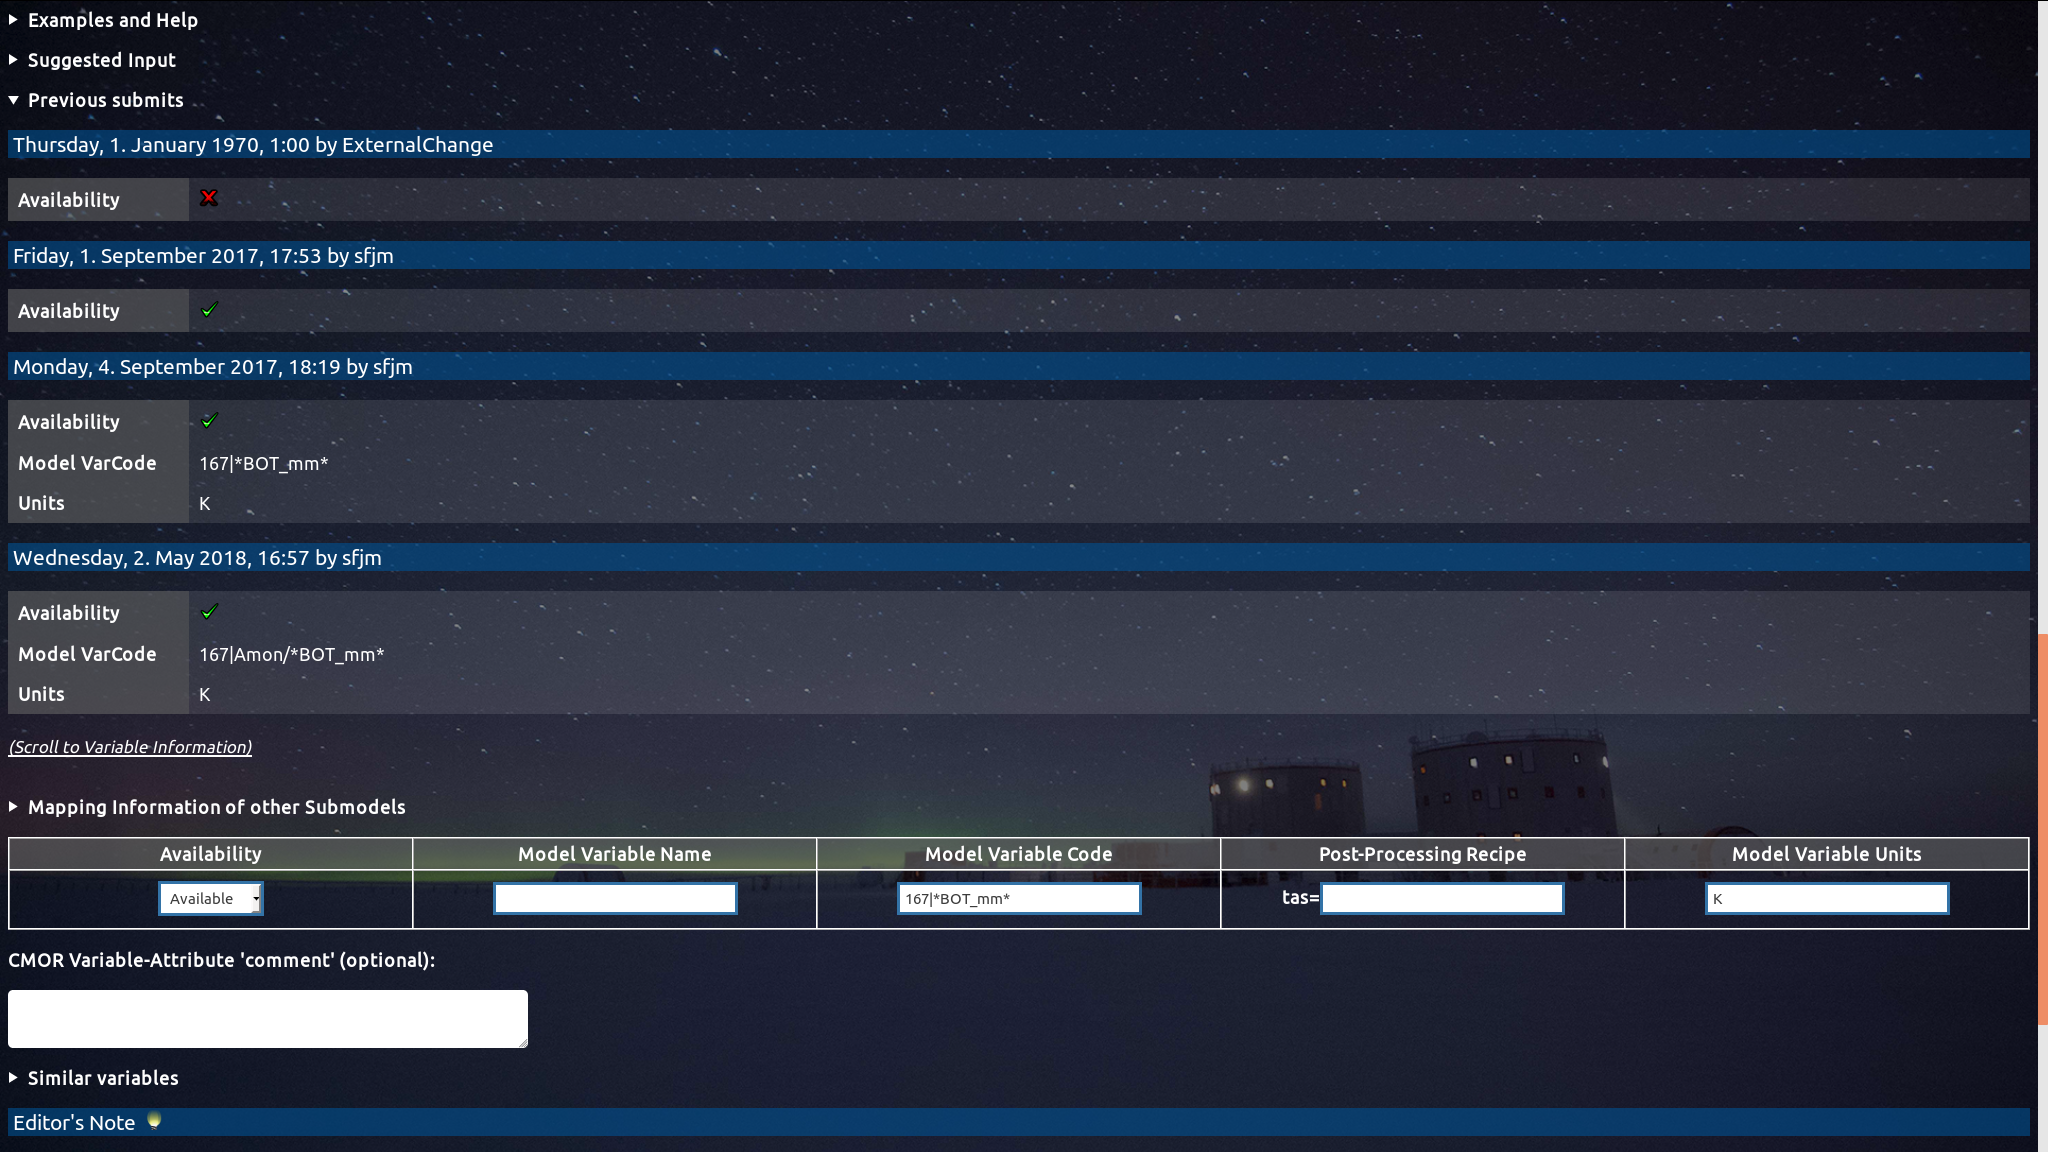
To keep track of changes made to the 'Variable Mapping Information' of the currently selected variable, also 'Previous Submits' are shown. It can be seen when this variable was edited by whom, and what changes were made. The latest 'Variable Mapping Information' fills the text boxes.
13 / 26
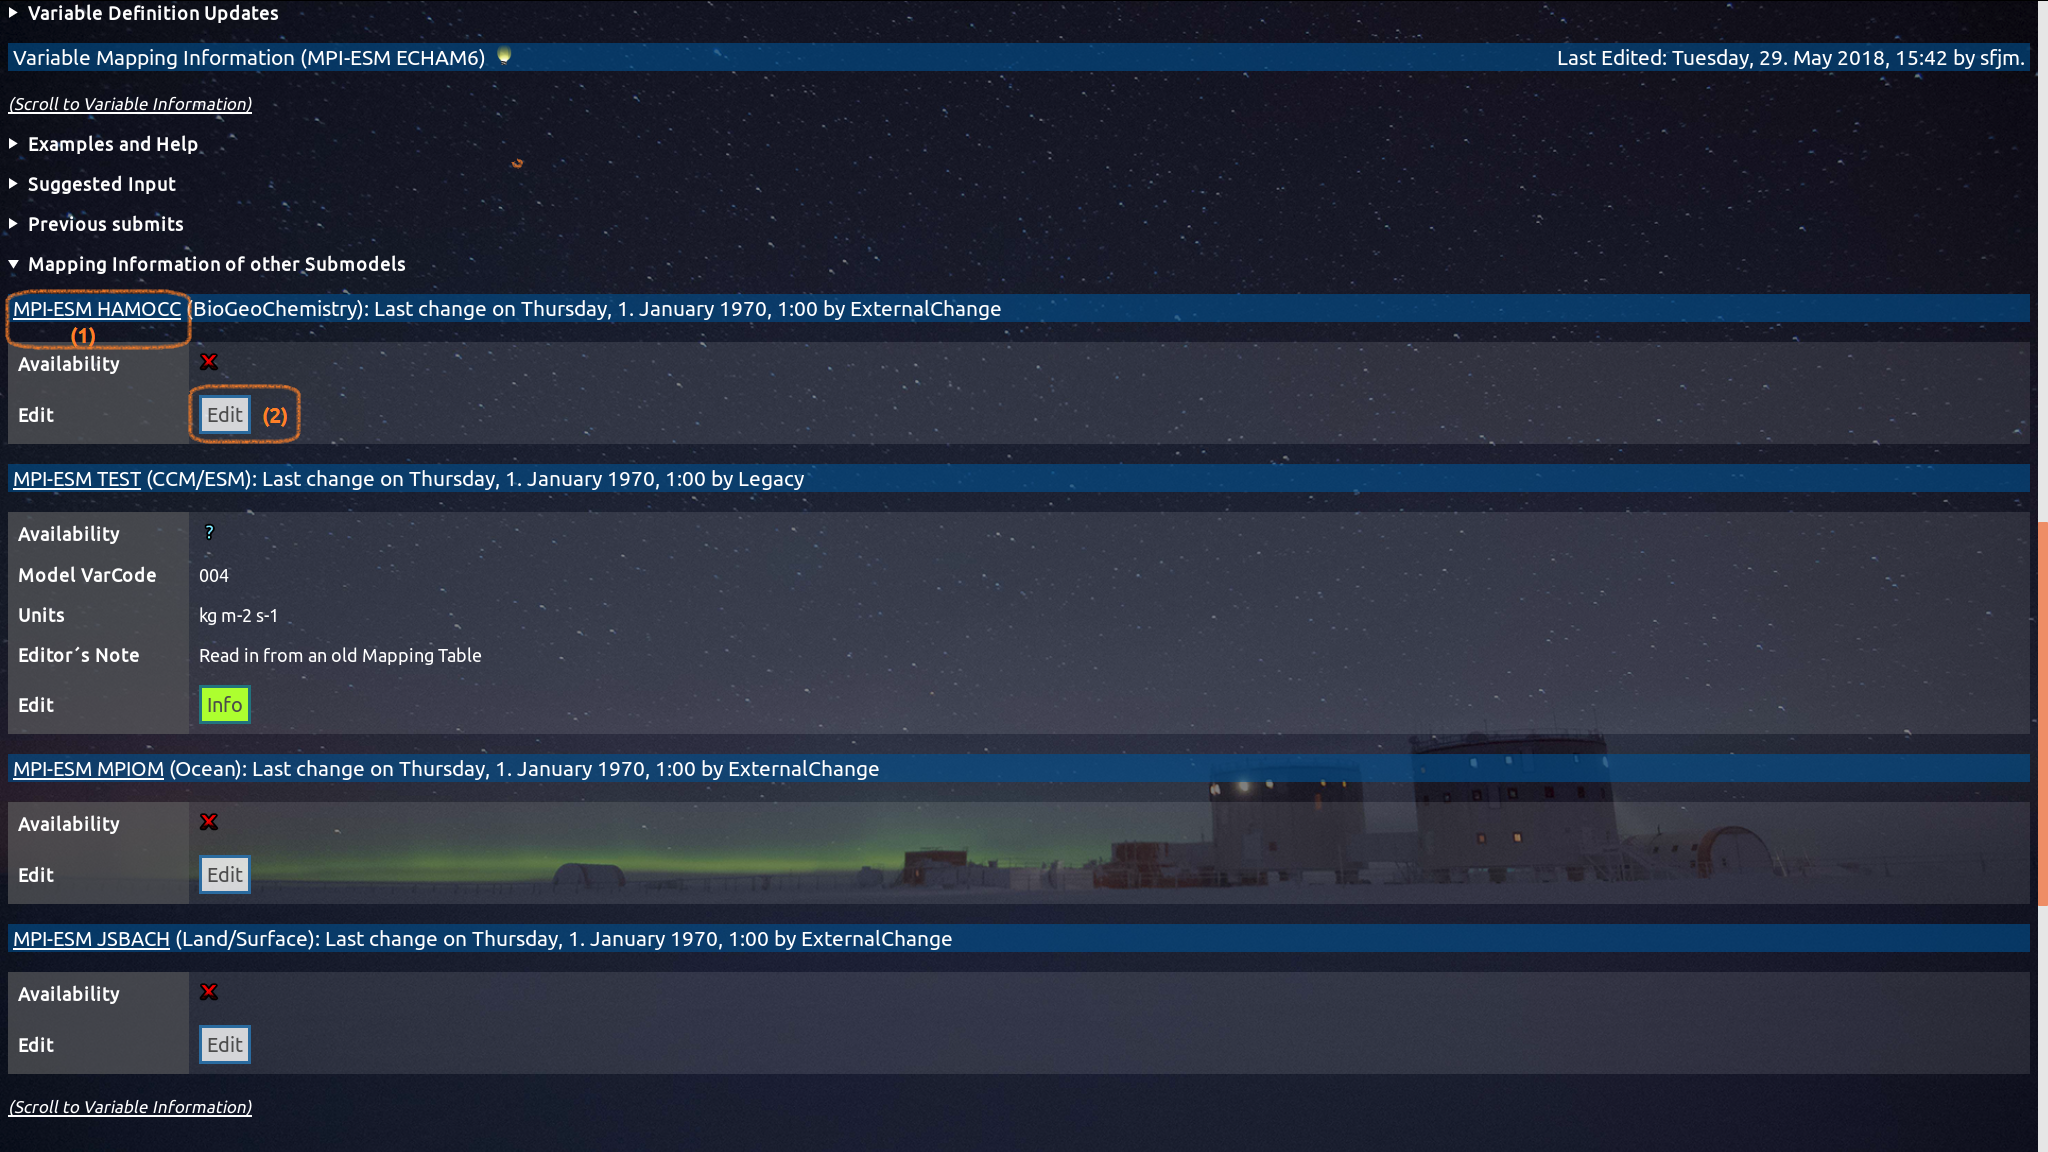
'Mapping Information of other Submodels' provides access to the information entered for the other submodels of the current CM/ESM. Besides showing the information, (1) opens the 'Table View' for the respective submodel, whereas (2) directly opens this submodels' 'Edit View' of the variable.
14 / 26
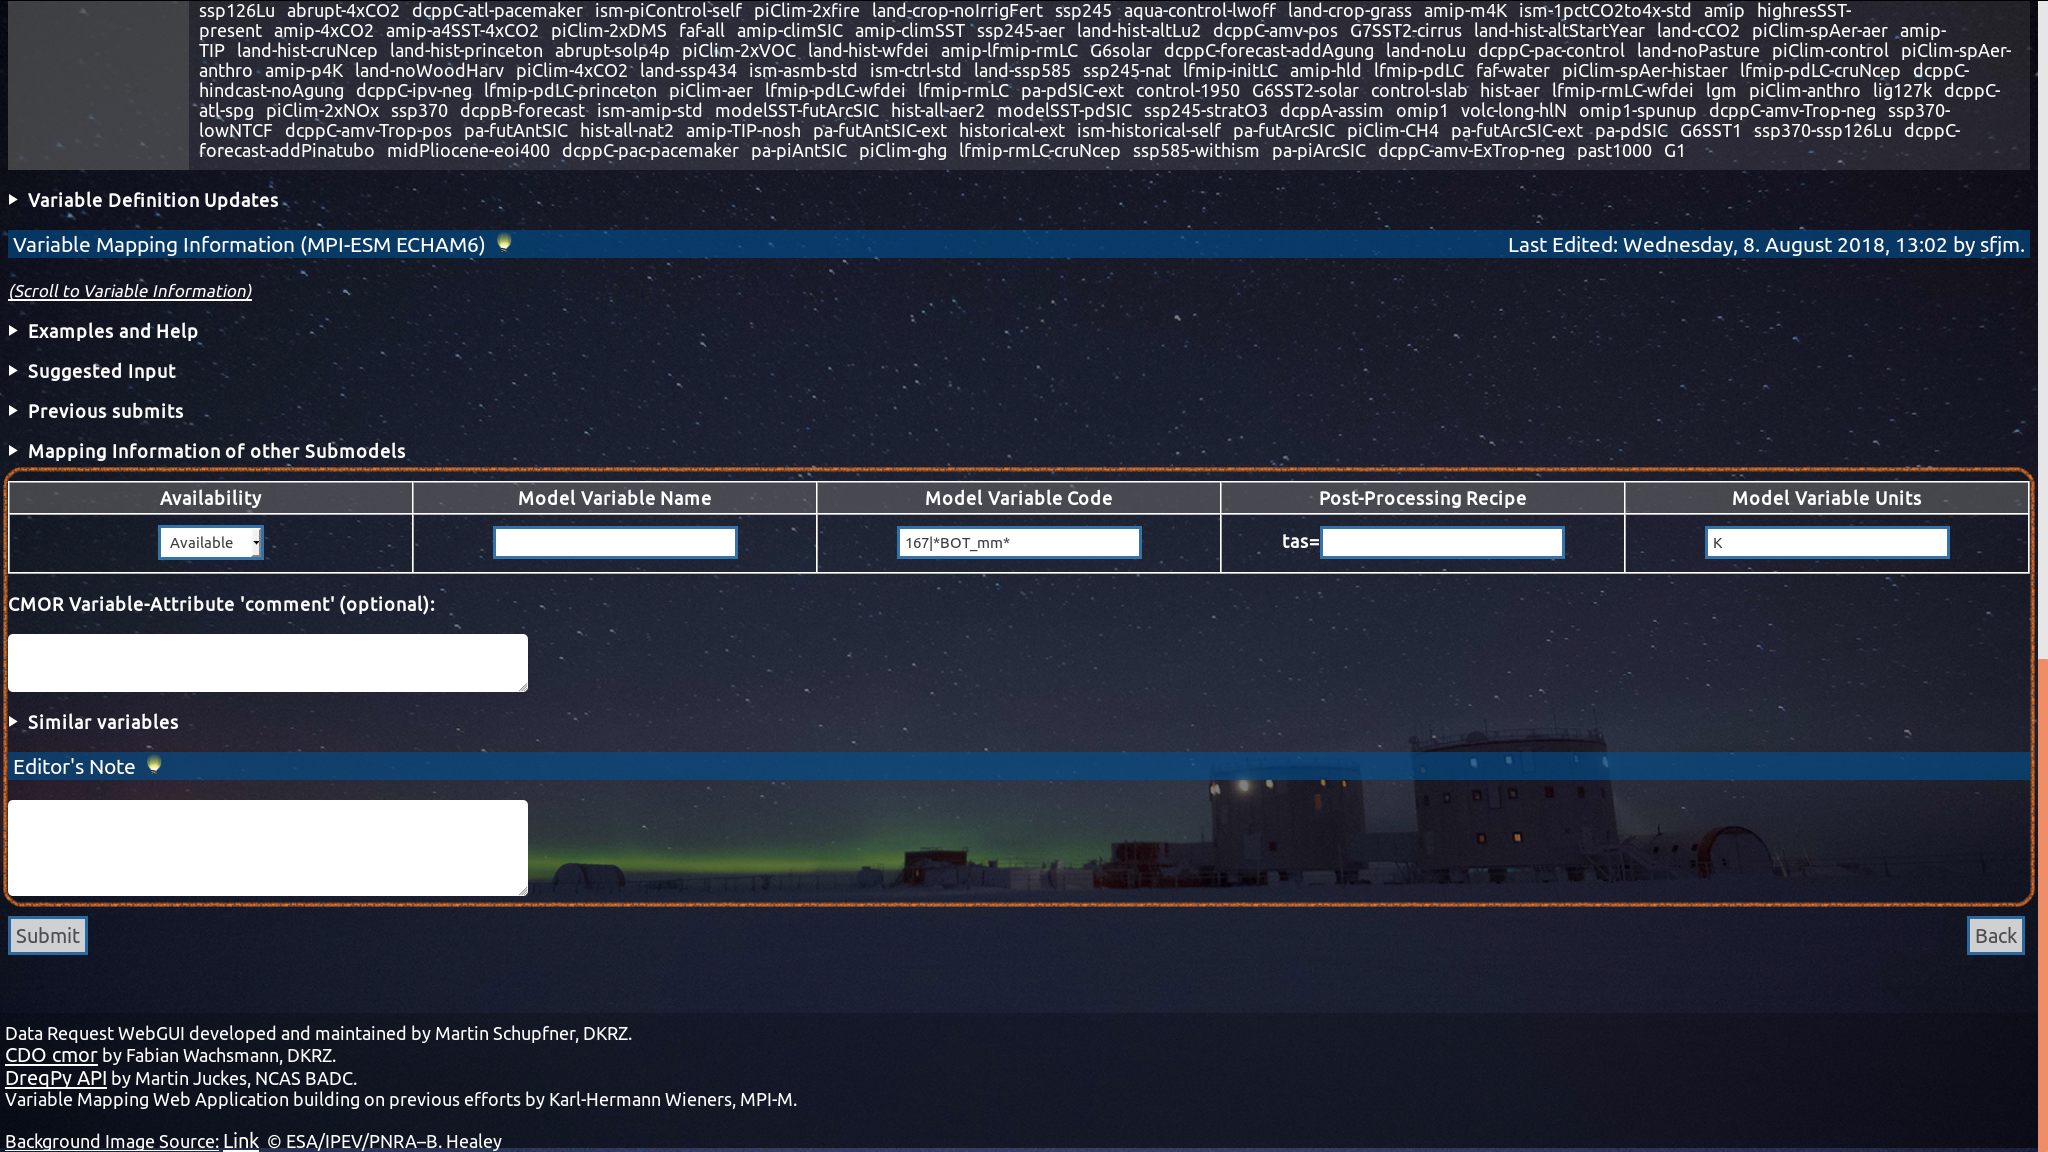
In the framed section you can fill in the 'Variable Mapping Information' of your Model. The previously mentioned 'Examples and Help' guide you through that process. A click on 'Submit' will add your entered 'Variable Mapping Information' to the database and close the tab. Note the (enlargable) 'Similar Variables'.
15 / 26
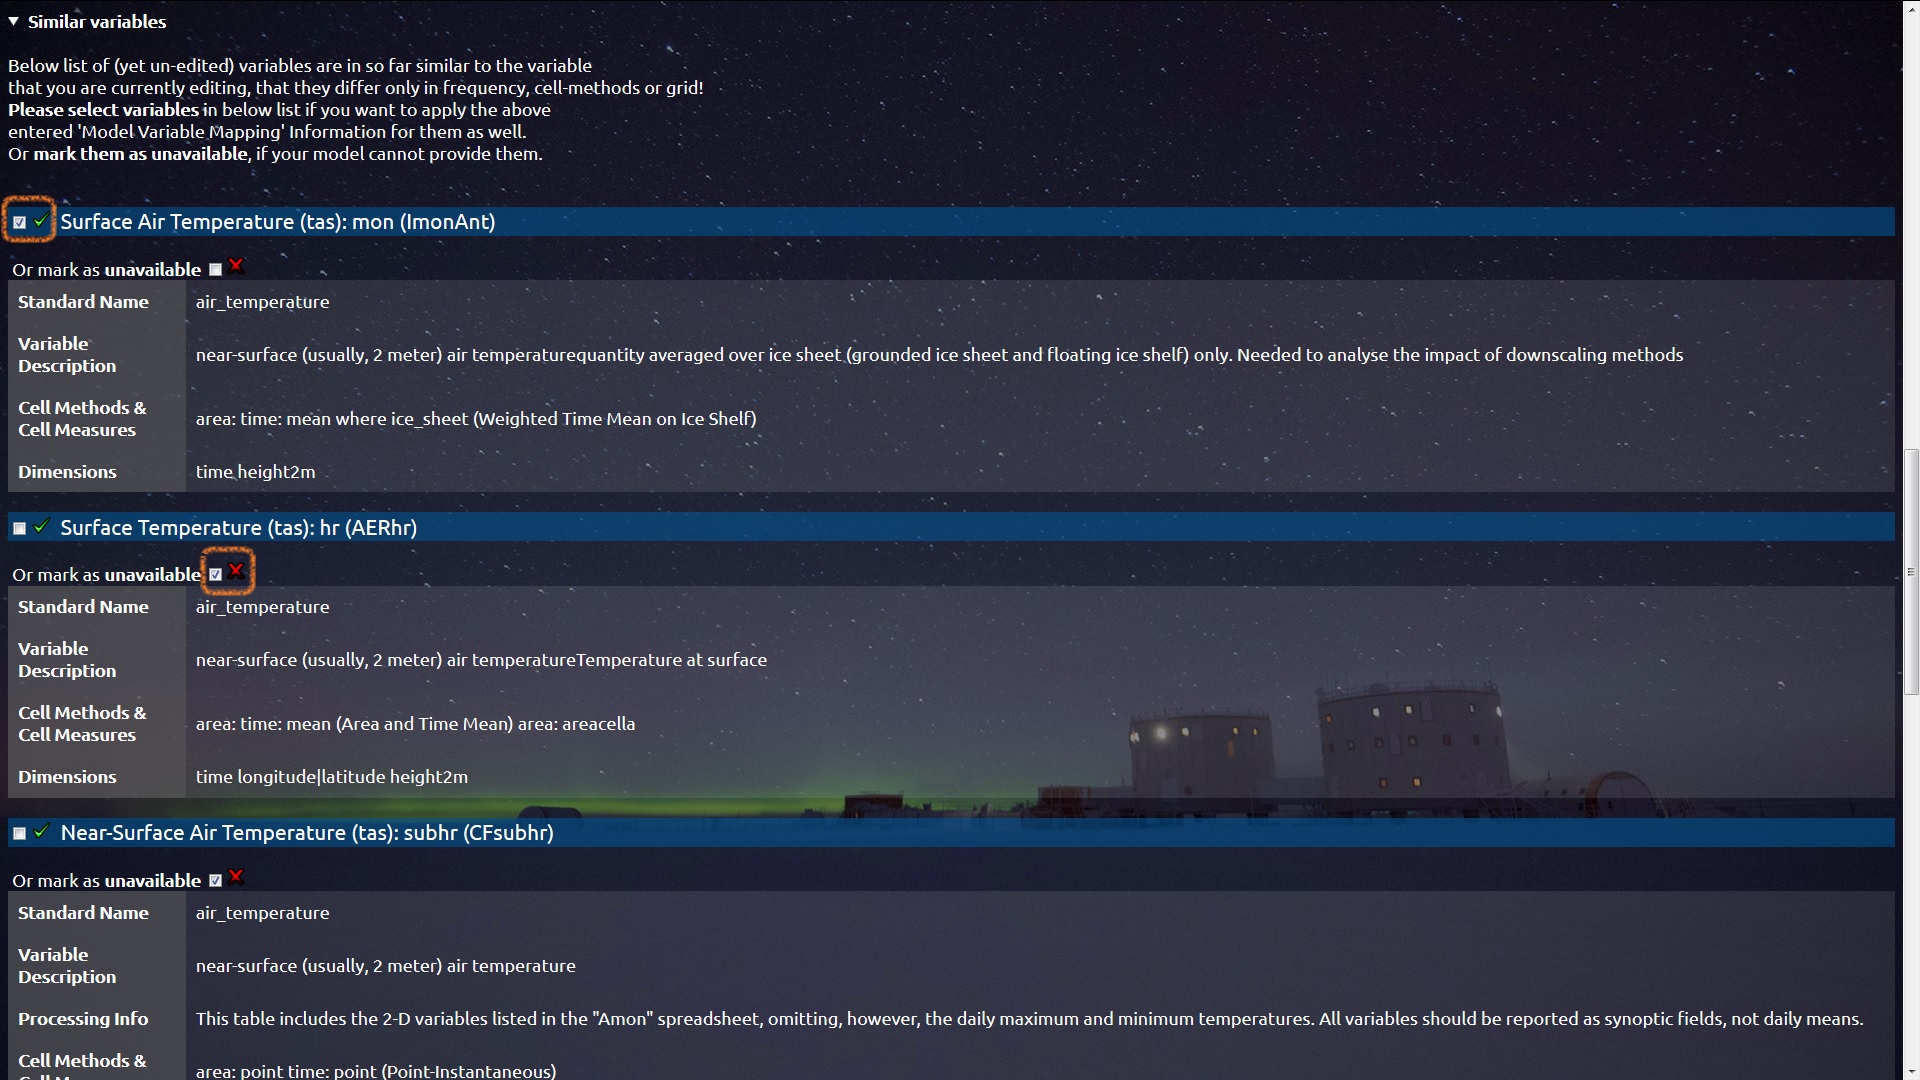
As already mentioned, 'Similar Variables' only differ from your selected CMOR variable in terms of frequency, requested grid or/and cell methods. Only variables without any entered 'Variable Mapping Information' are shown as 'Similar Variables'! You can choose for each of them whether you want mark them as 'unavailable' in your Model or whether you want to set above entered 'Variable Mapping Information' also for them when hitting the 'Submit'-button. Again, the 'Examples and Help' provide further guidance.
16 / 26
If you use illegal characters or do not match the format requirements you will have to alter your input. Note that this is only a superficial check of the information you entered. A deeper check will be performed when the mapping table files are generated (as shown on the first 2 slides).
17 / 26
When you entered all information correctly, the tab will close. Back in the main 'Table View' the changes you (and other users) made in the meantime. If you hover over an entry in the 'Last Edited' column you are shown the 'Editor's Notes' (if available).
18 / 26
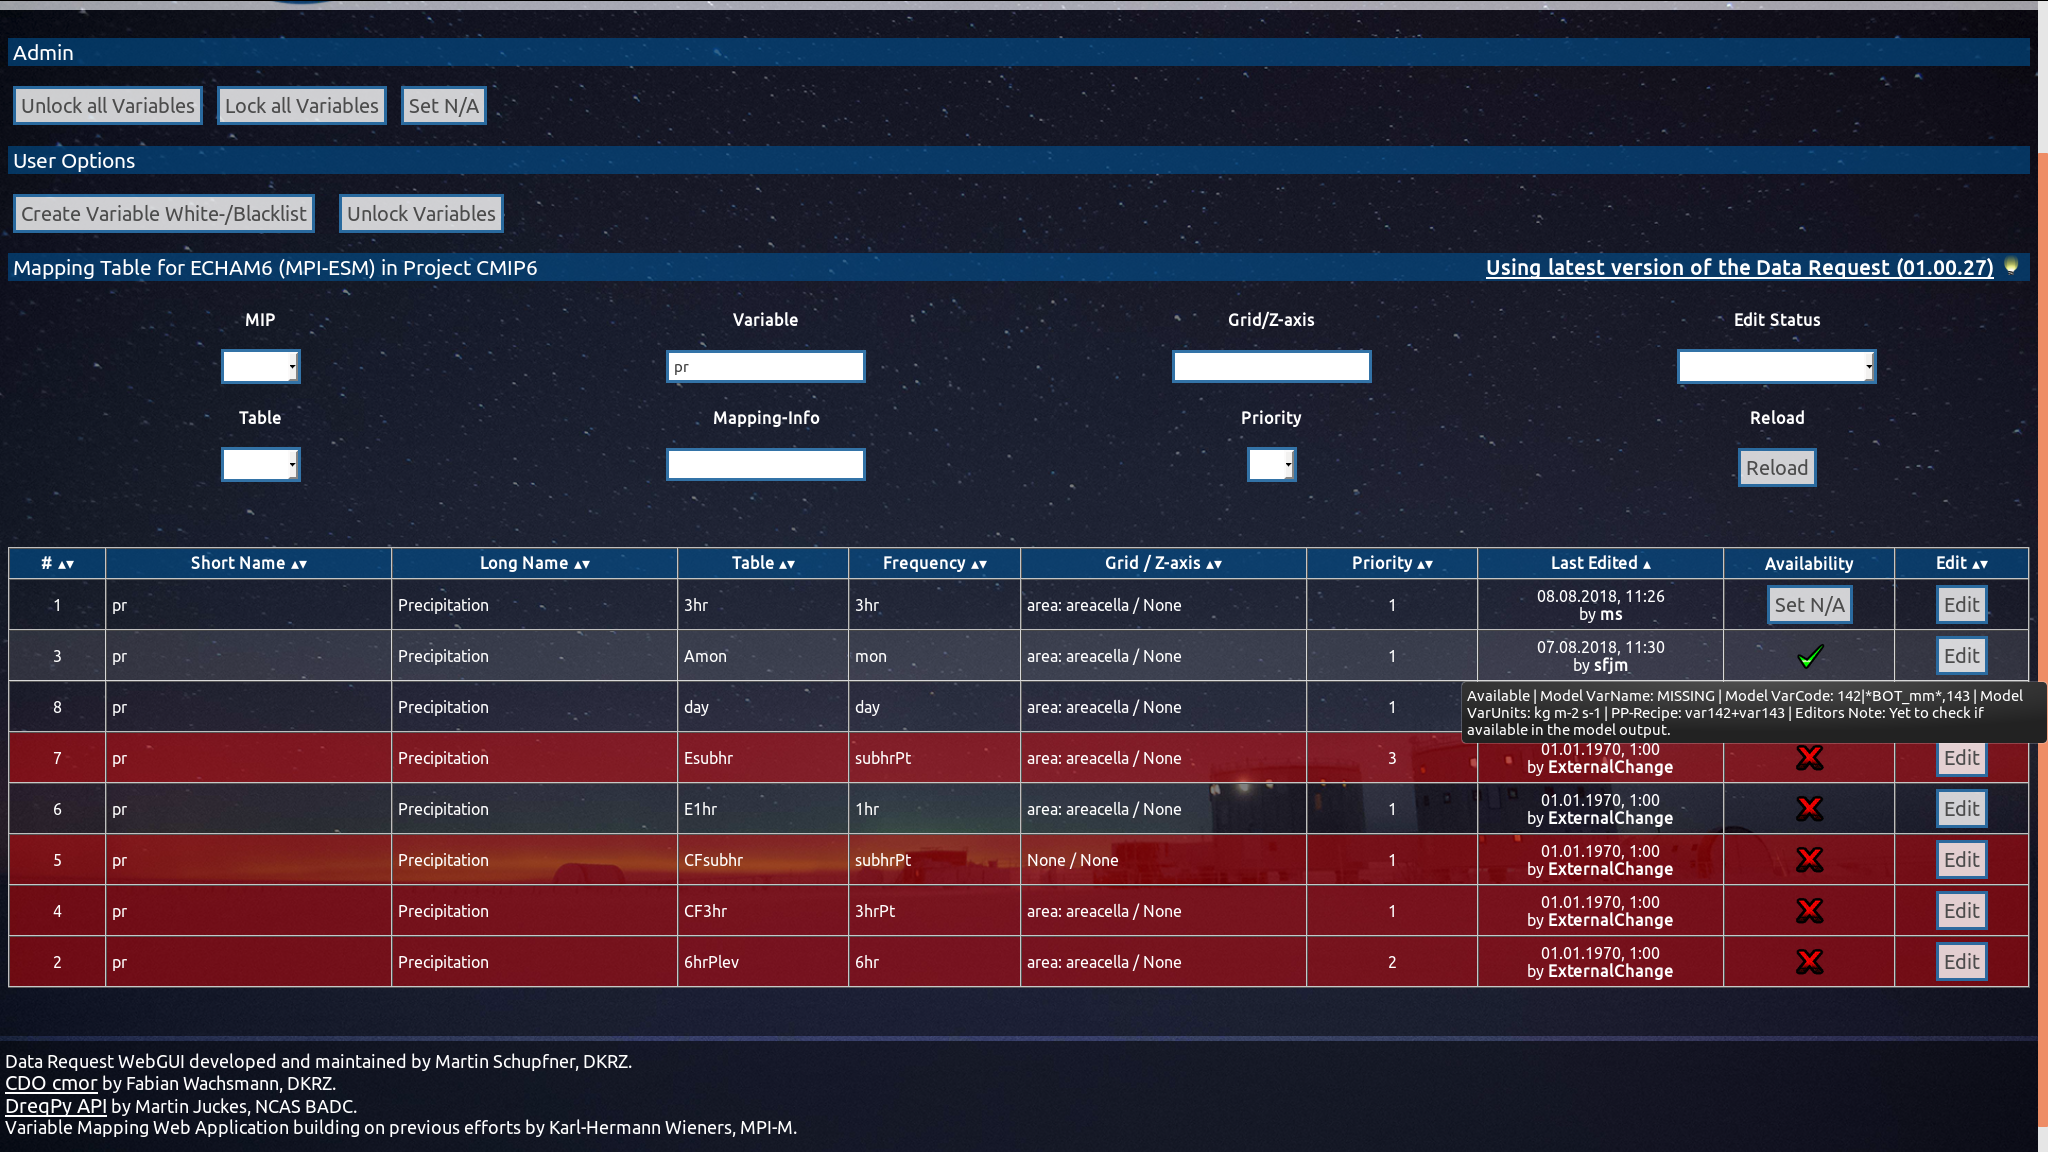
Hovering over the 'Availability' entry, will display all entered or yet missing 'Variable Mapping Information'. Note that 'hover information' is available for most of the elements in the table and in the variable 'Edit View'!
19 / 26
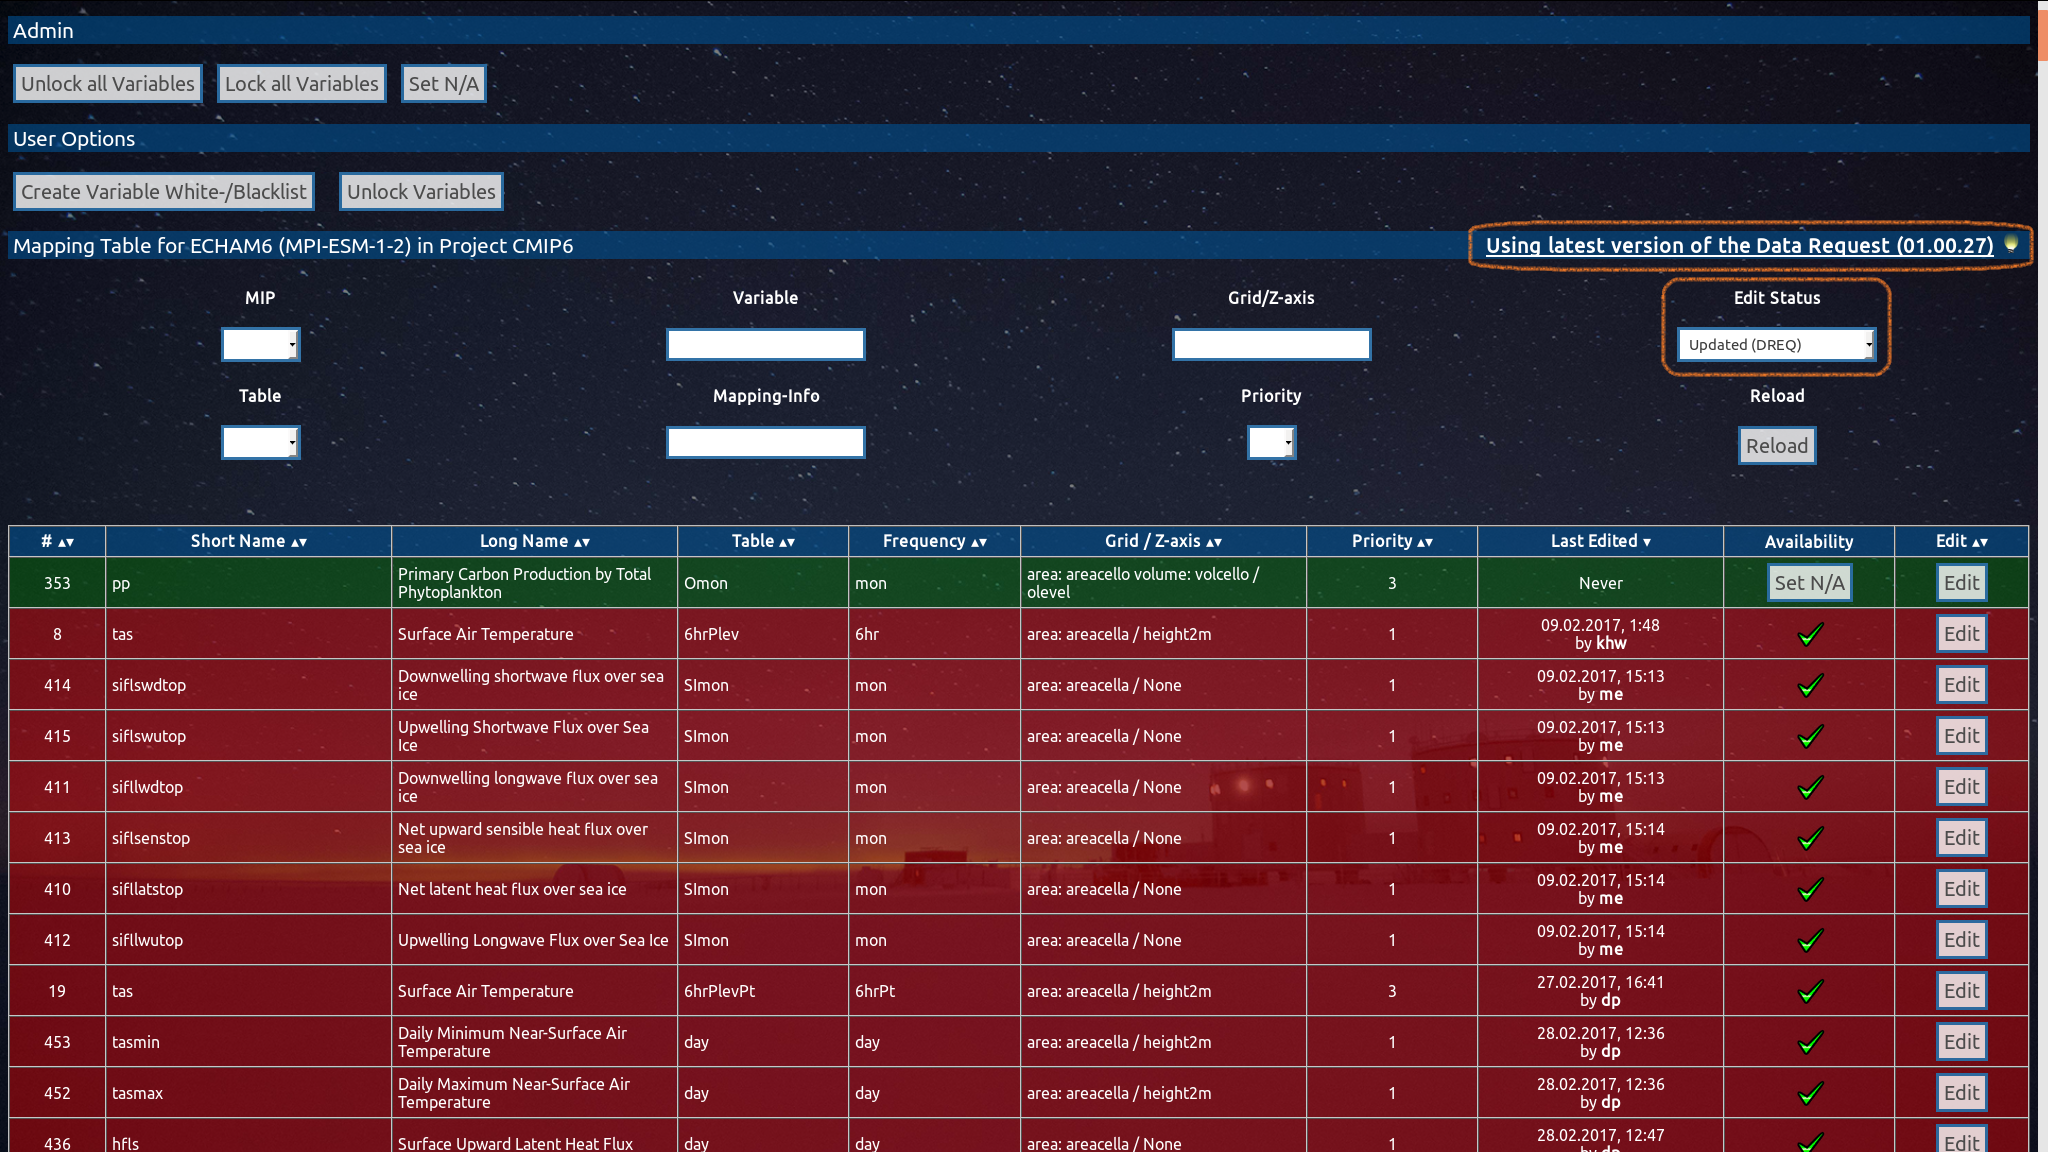
The currently used data request version is displayed in the upper right corner. If an update is incoming, it will be shown at the same place. The text is also a link to the 'Data Request Updates' (see next slide).
As already stated, variable definitions may change with updates. New variables will be highlighted in green. Variables that had their definiton changed since their latest editing will be highlighted in red. The highlighting colours disappear when someone clicks on the 'Submit Changes' button in the variable's editing view, or in case of 'new' variables, also when a new udpate of the data request releases. Note that there is a filter to show only updated variables.
As already stated, variable definitions may change with updates. New variables will be highlighted in green. Variables that had their definiton changed since their latest editing will be highlighted in red. The highlighting colours disappear when someone clicks on the 'Submit Changes' button in the variable's editing view, or in case of 'new' variables, also when a new udpate of the data request releases. Note that there is a filter to show only updated variables.
20 / 26
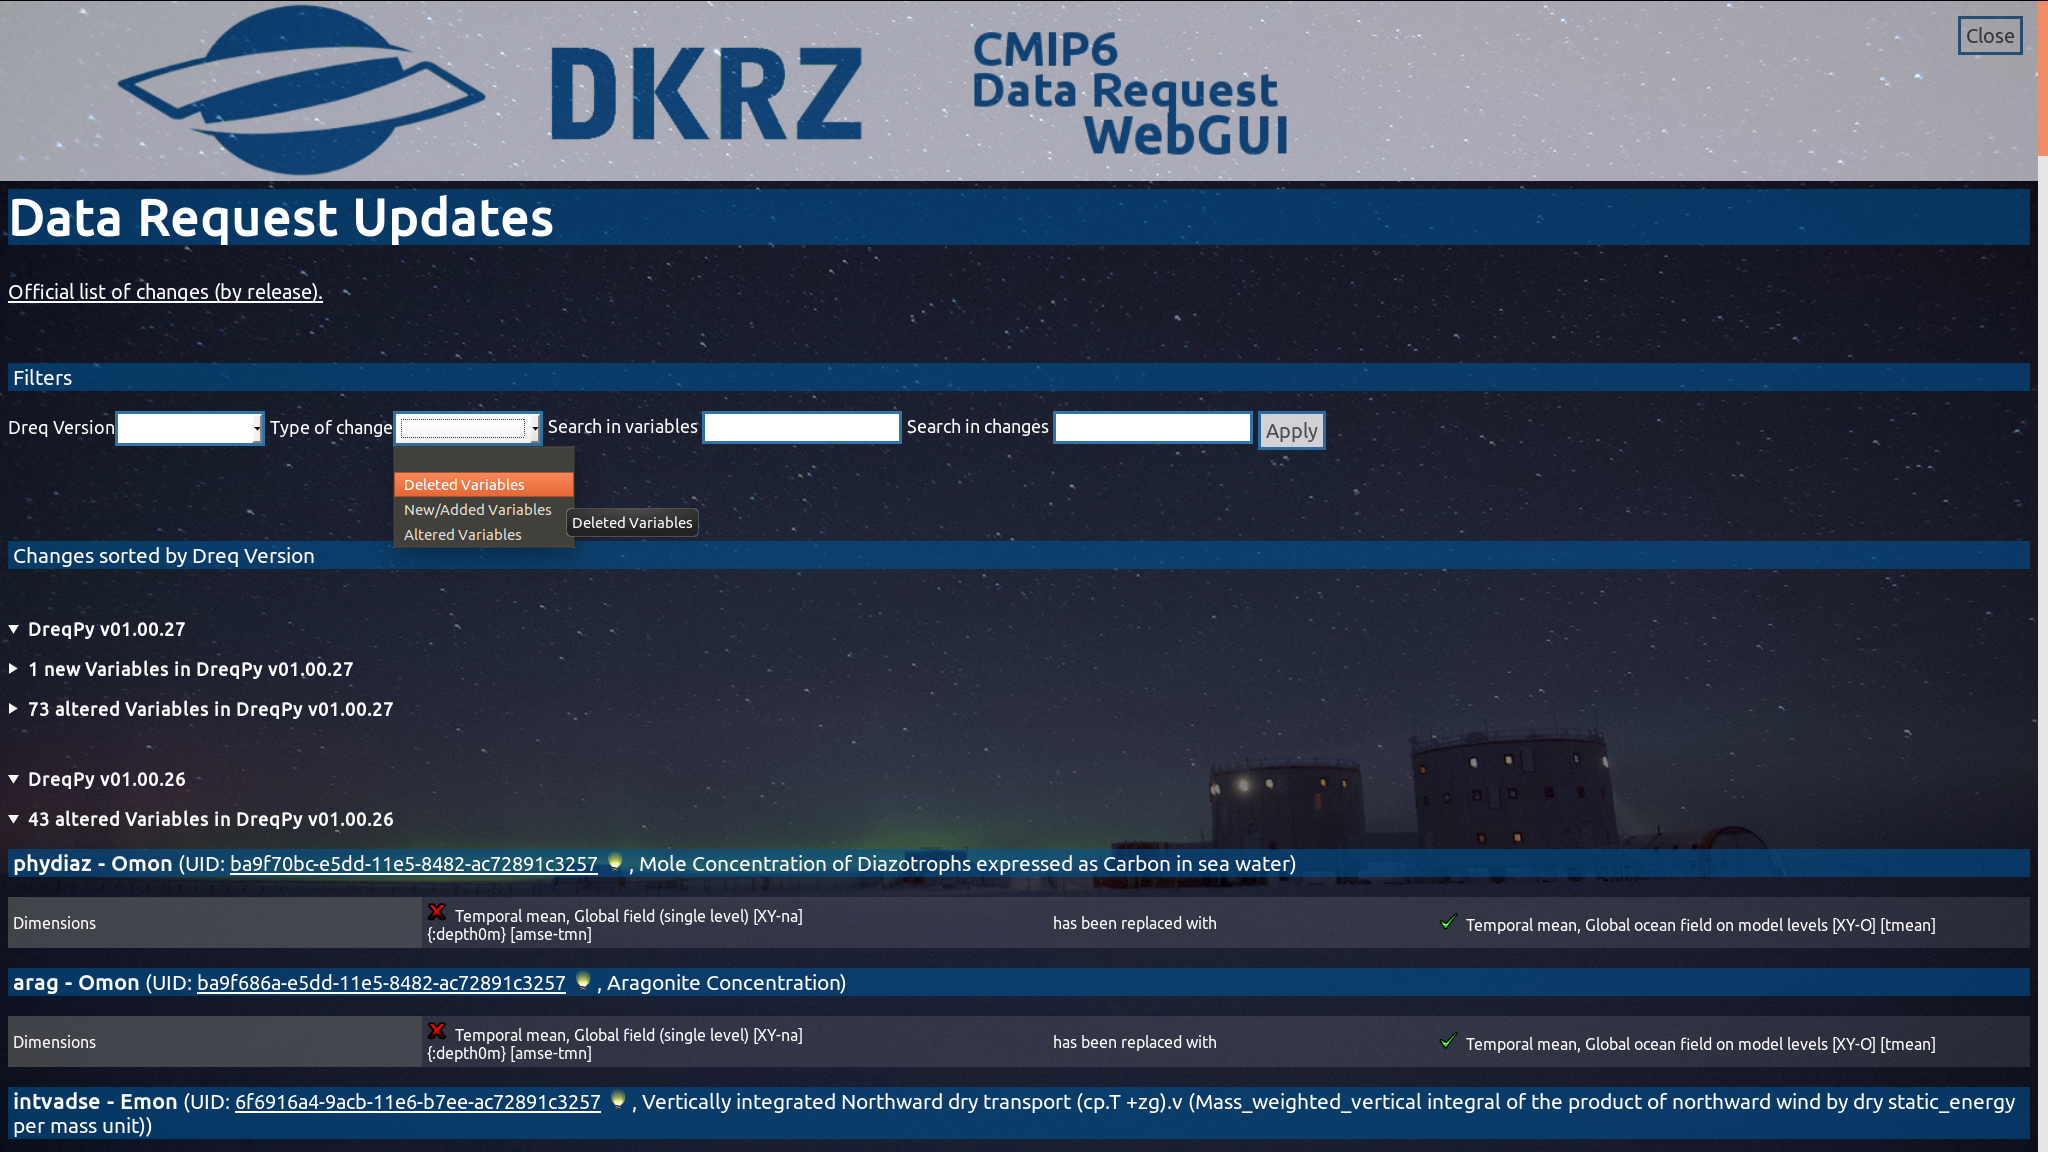
This page lists the Data Request Updates. Several filters help to browse through the changes. The use of wildcard characters ('%' and '_') is possible.
21 / 26
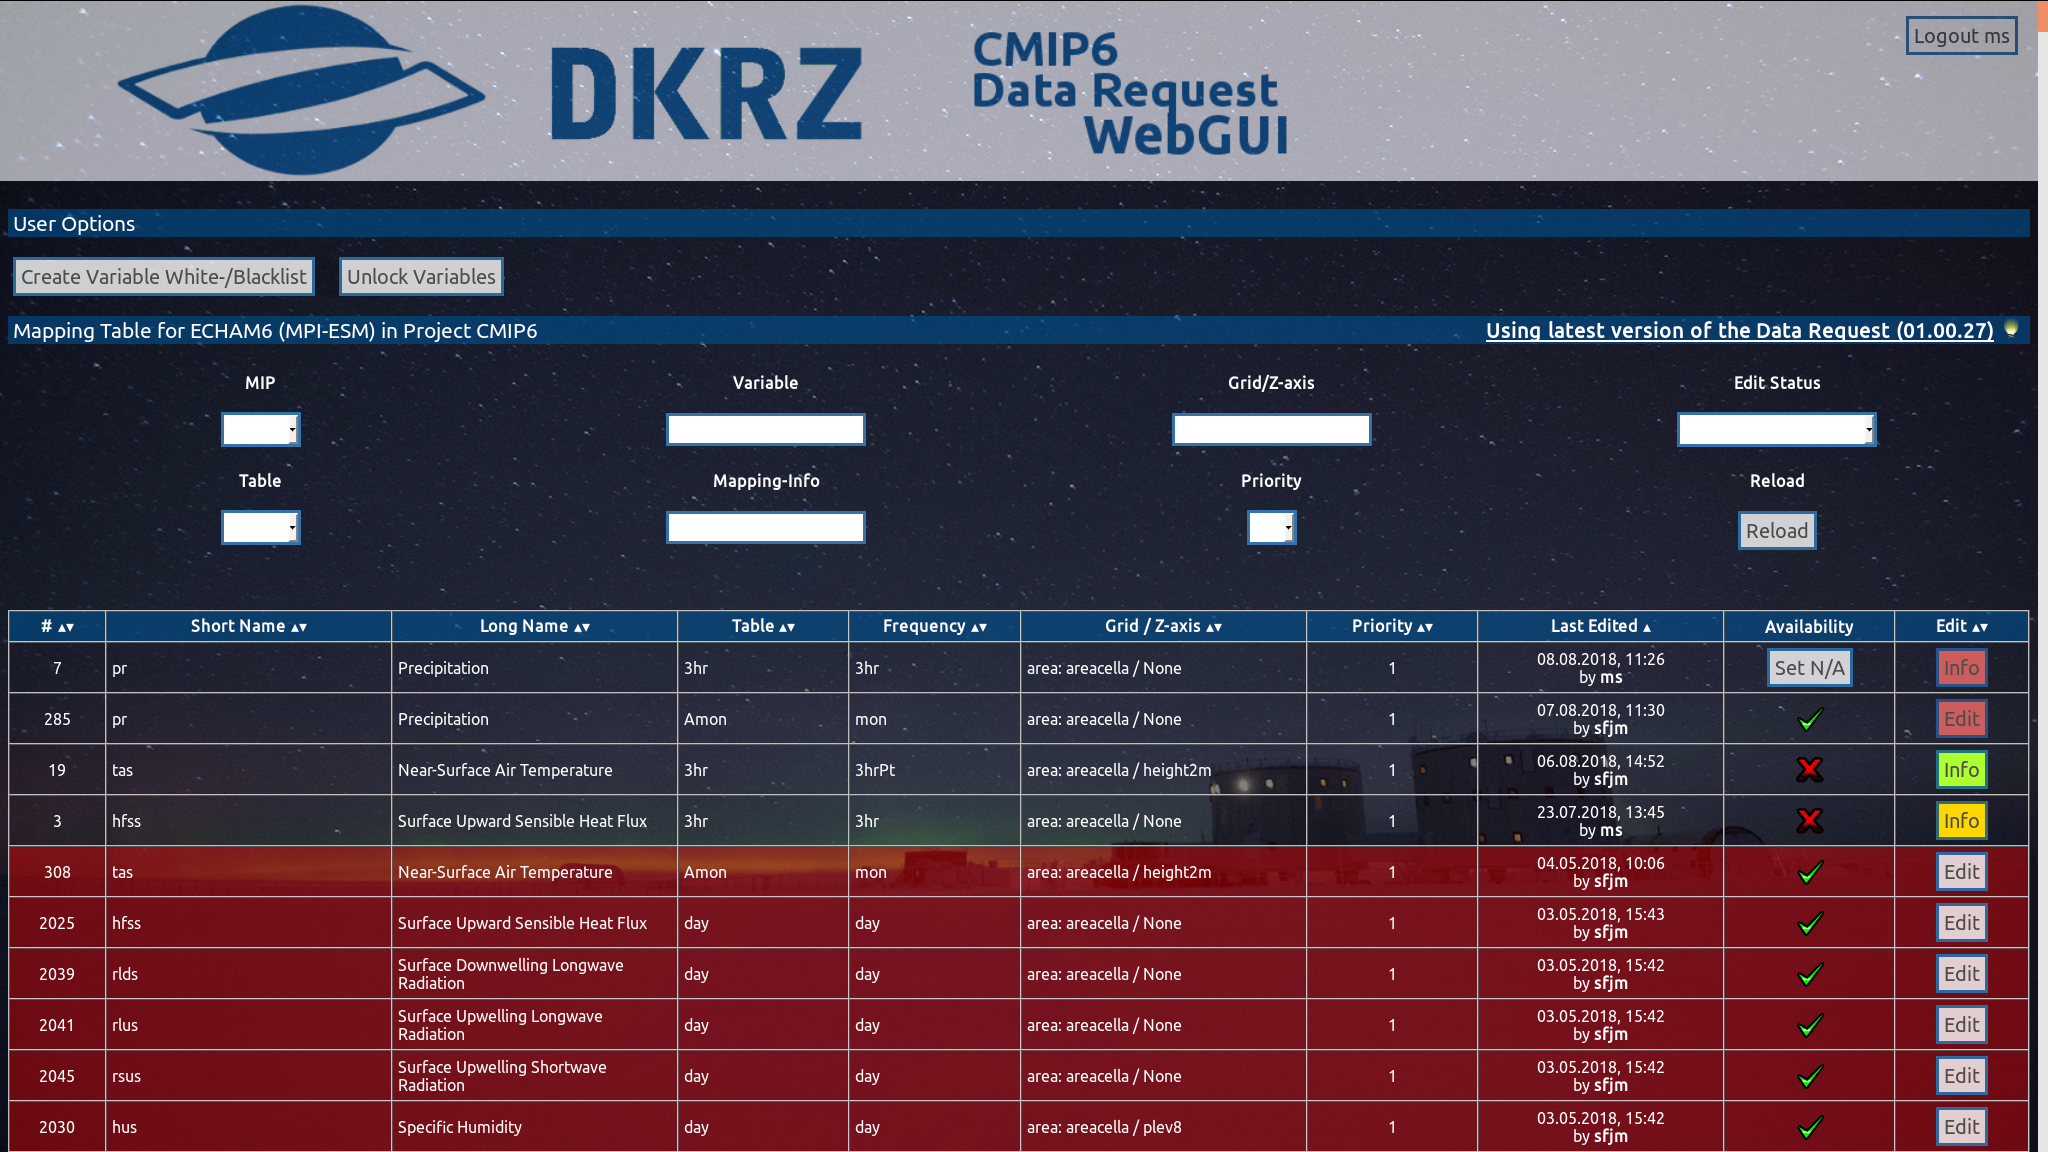
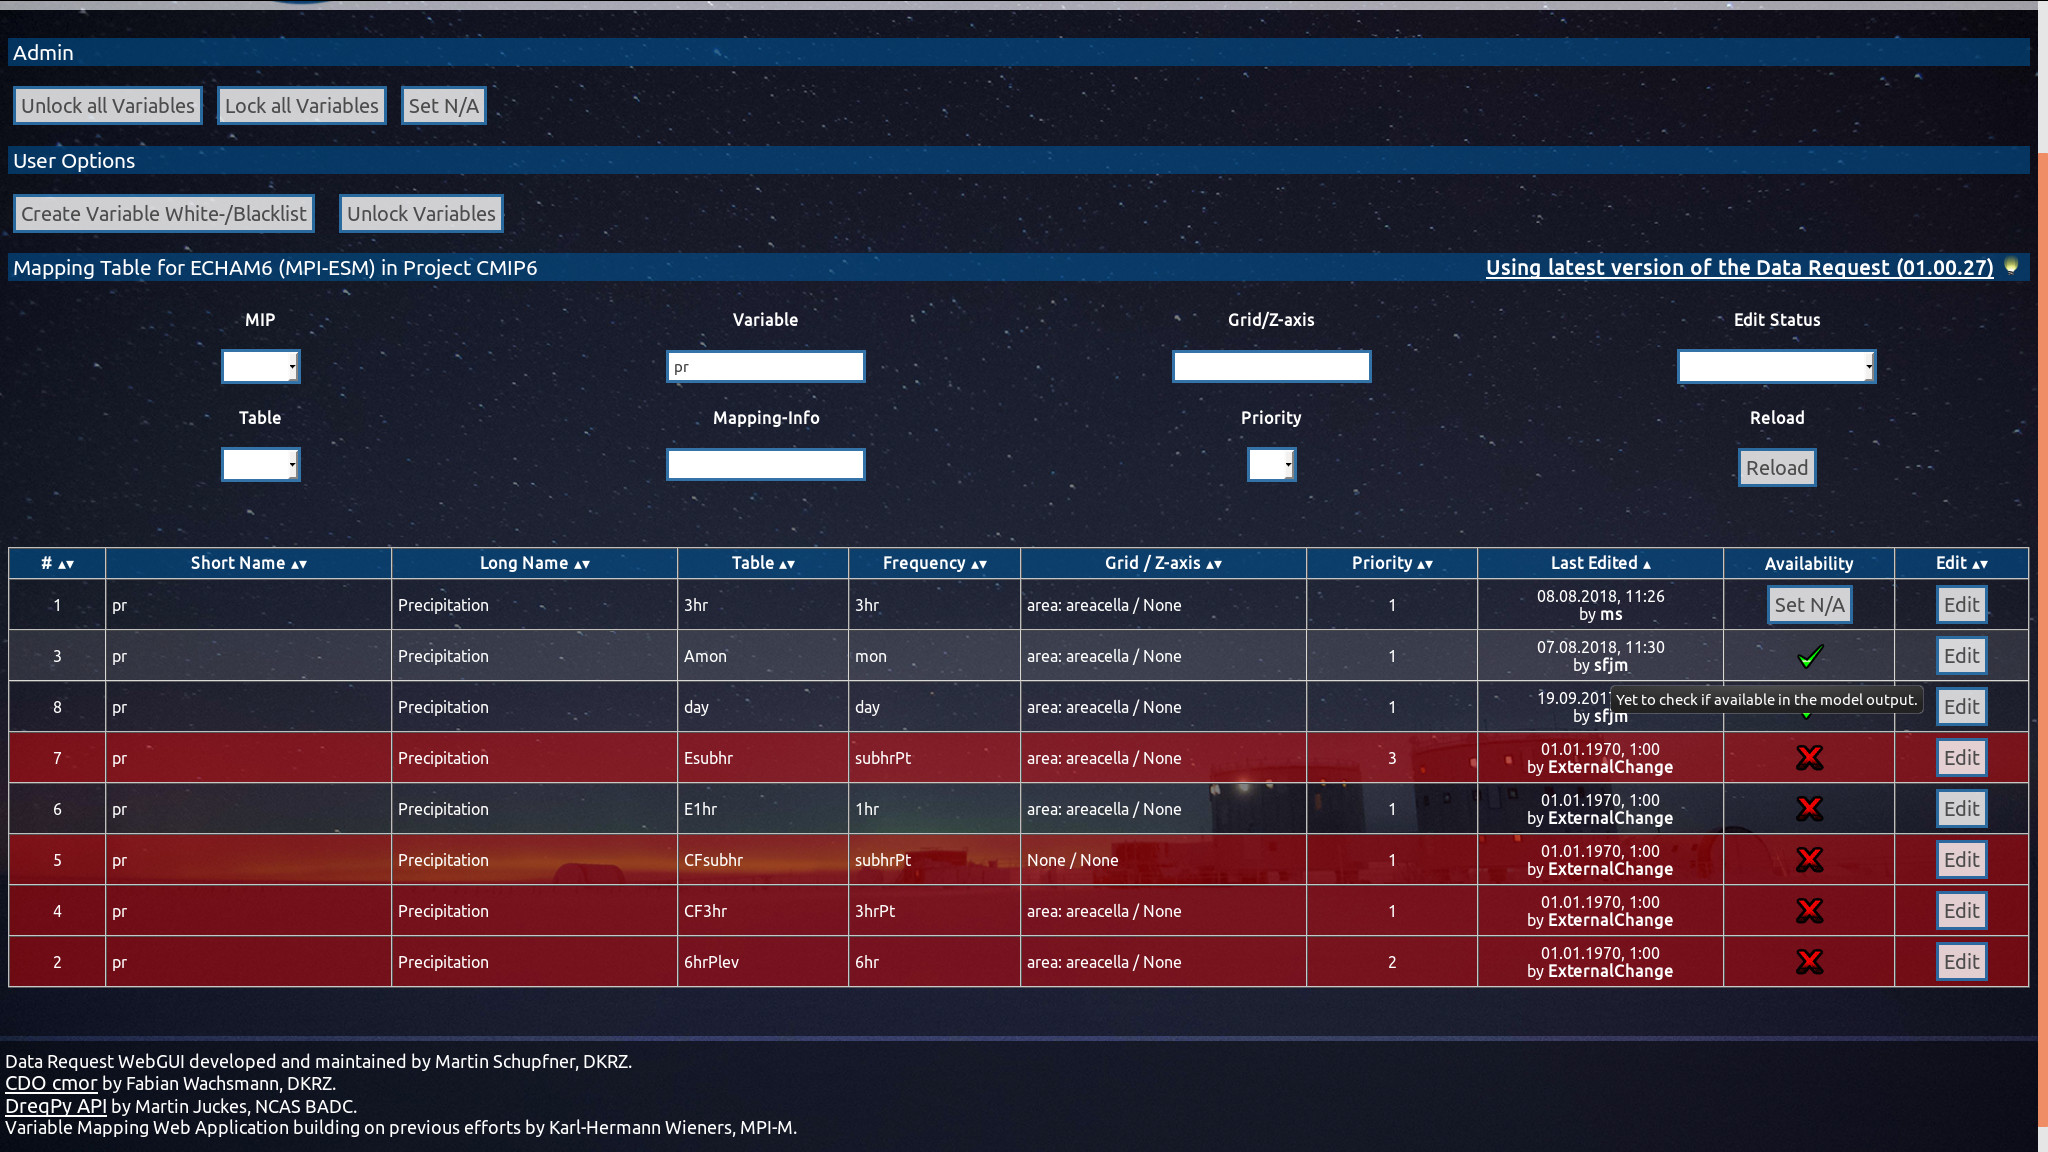
If the 'Edit' button is white the variable can be edited by everyone. Variables edited by you, have a red 'Edit' button. 'Similar Variables' locked by you have a red 'Info' button. Variables edited by other users have a yellow 'Info' button. Variables locked by Admins have a green 'Info' button as they are considered as finalised. Variables with an 'Info' button cannot be edited until the editing user or an admin unlock them.
22 / 26
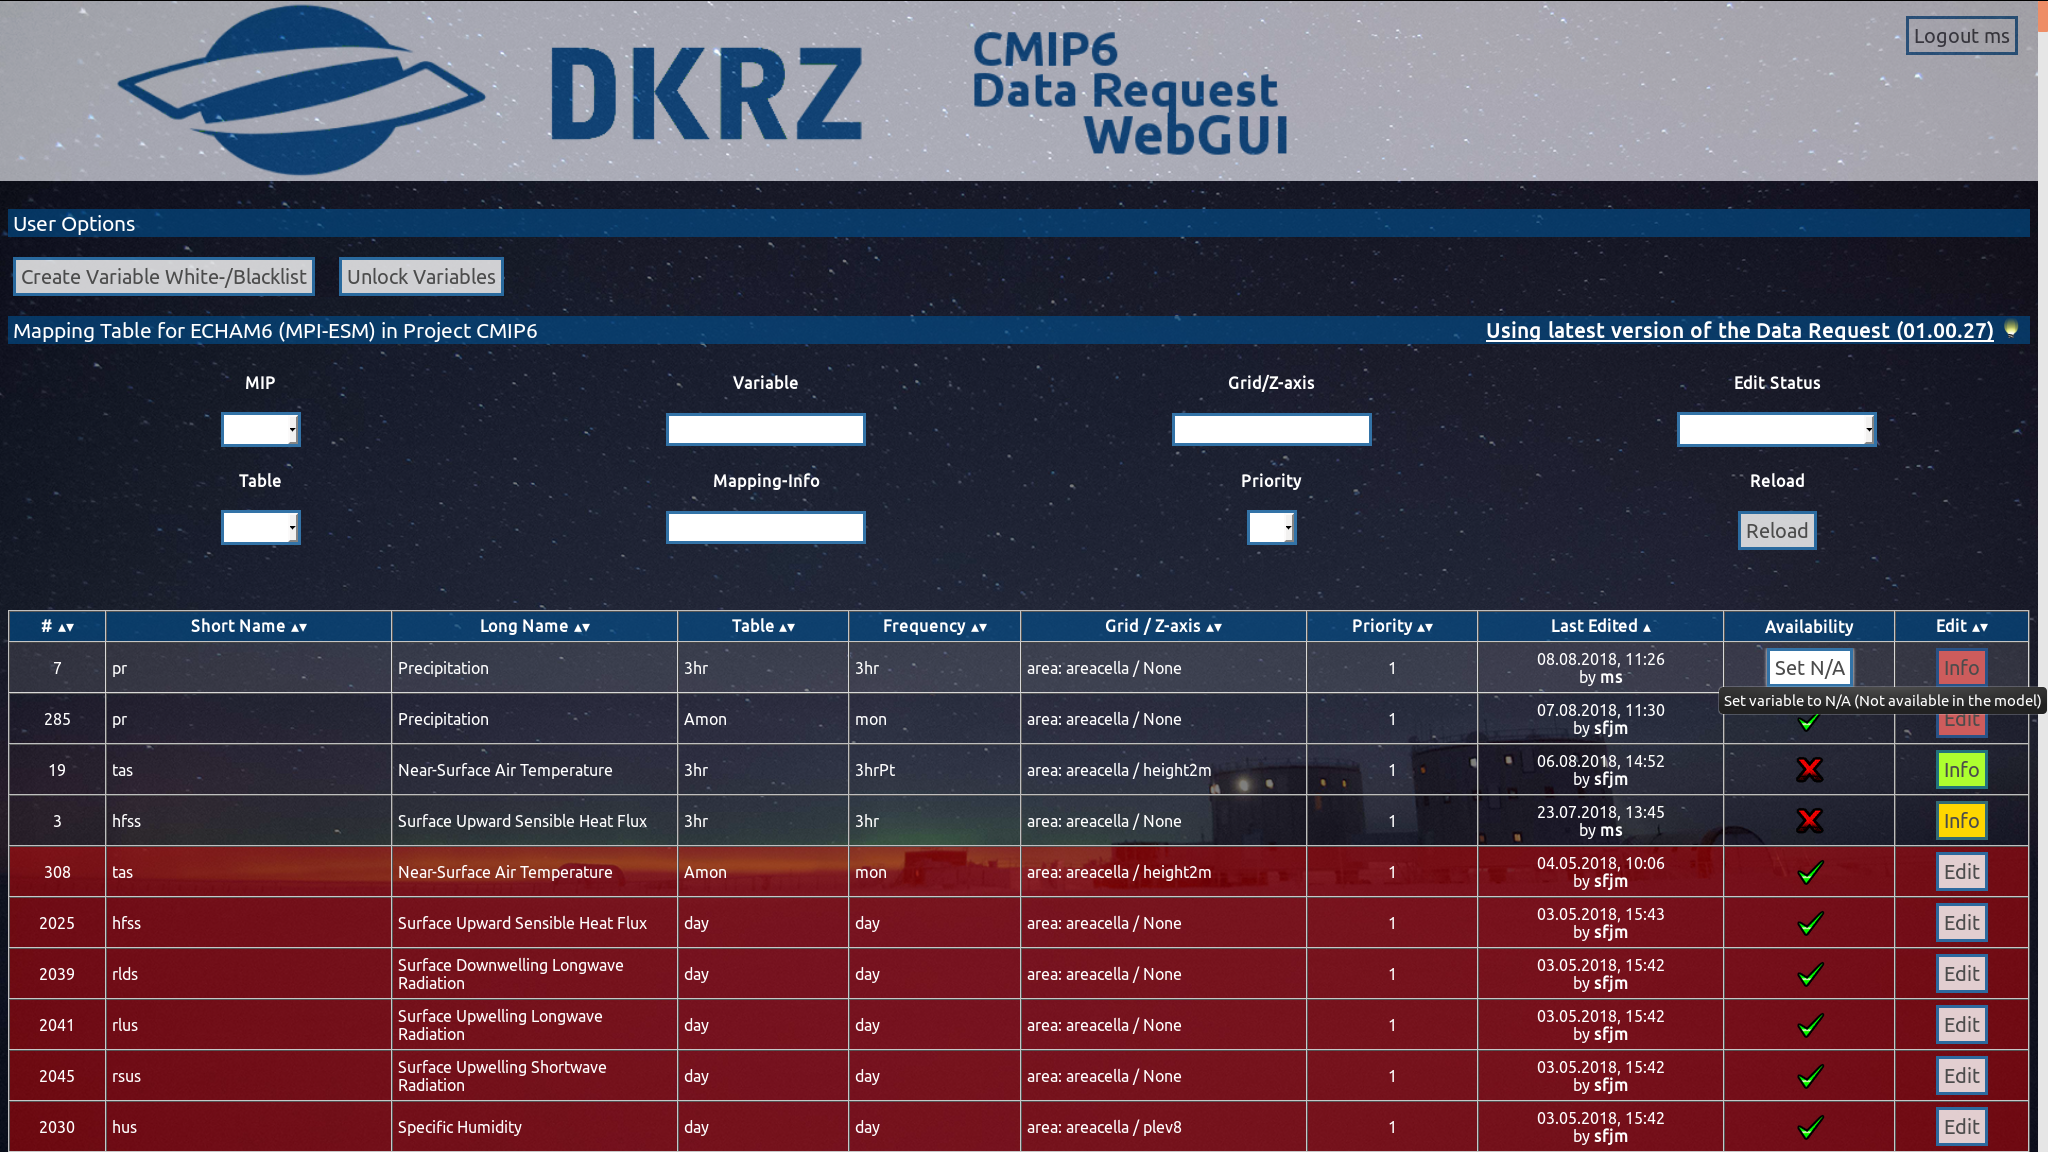
Variables that have no entered model mapping information at the moment can be set to 'N/A' (not available in the model) using this button. This information will help other modelers and yourself to keep track on which variables can be produced by the model. However, only variables selected as 'Available' will be written into the mapping and recipe table!
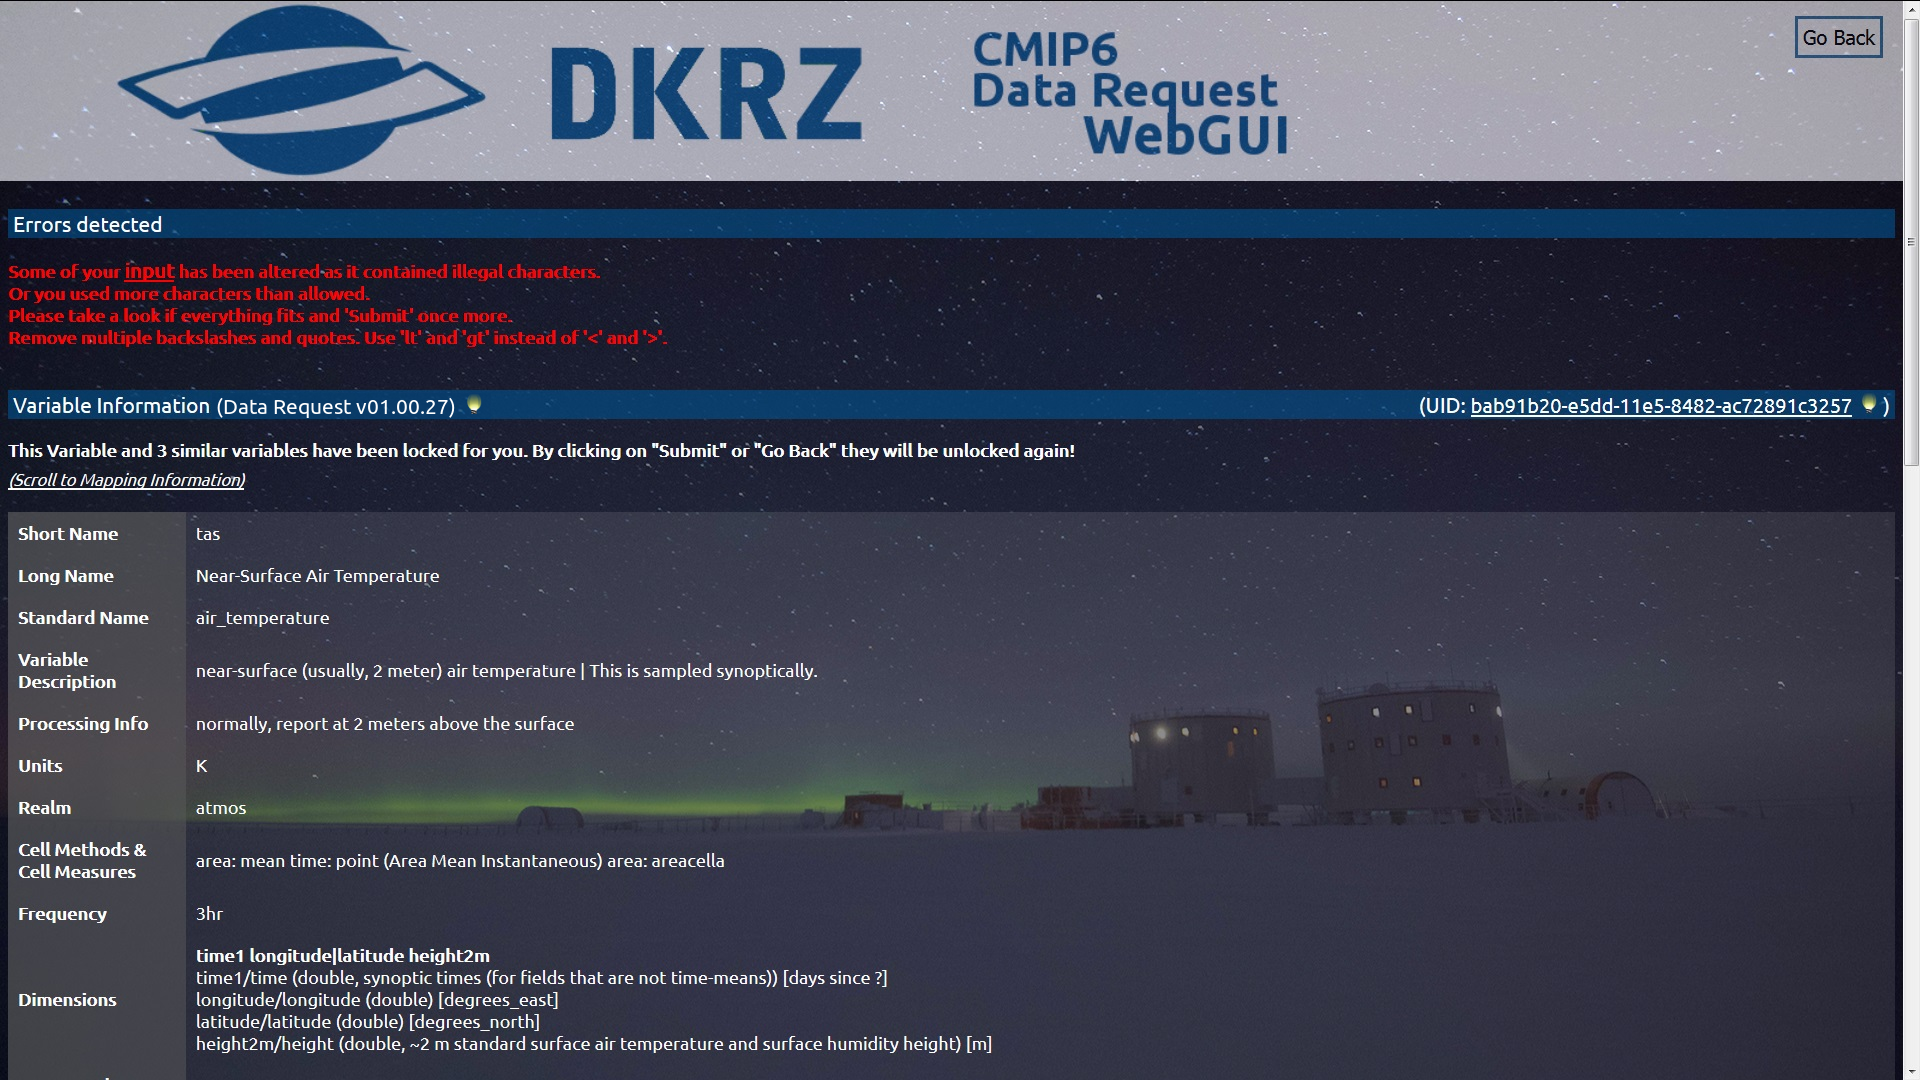
23 / 26
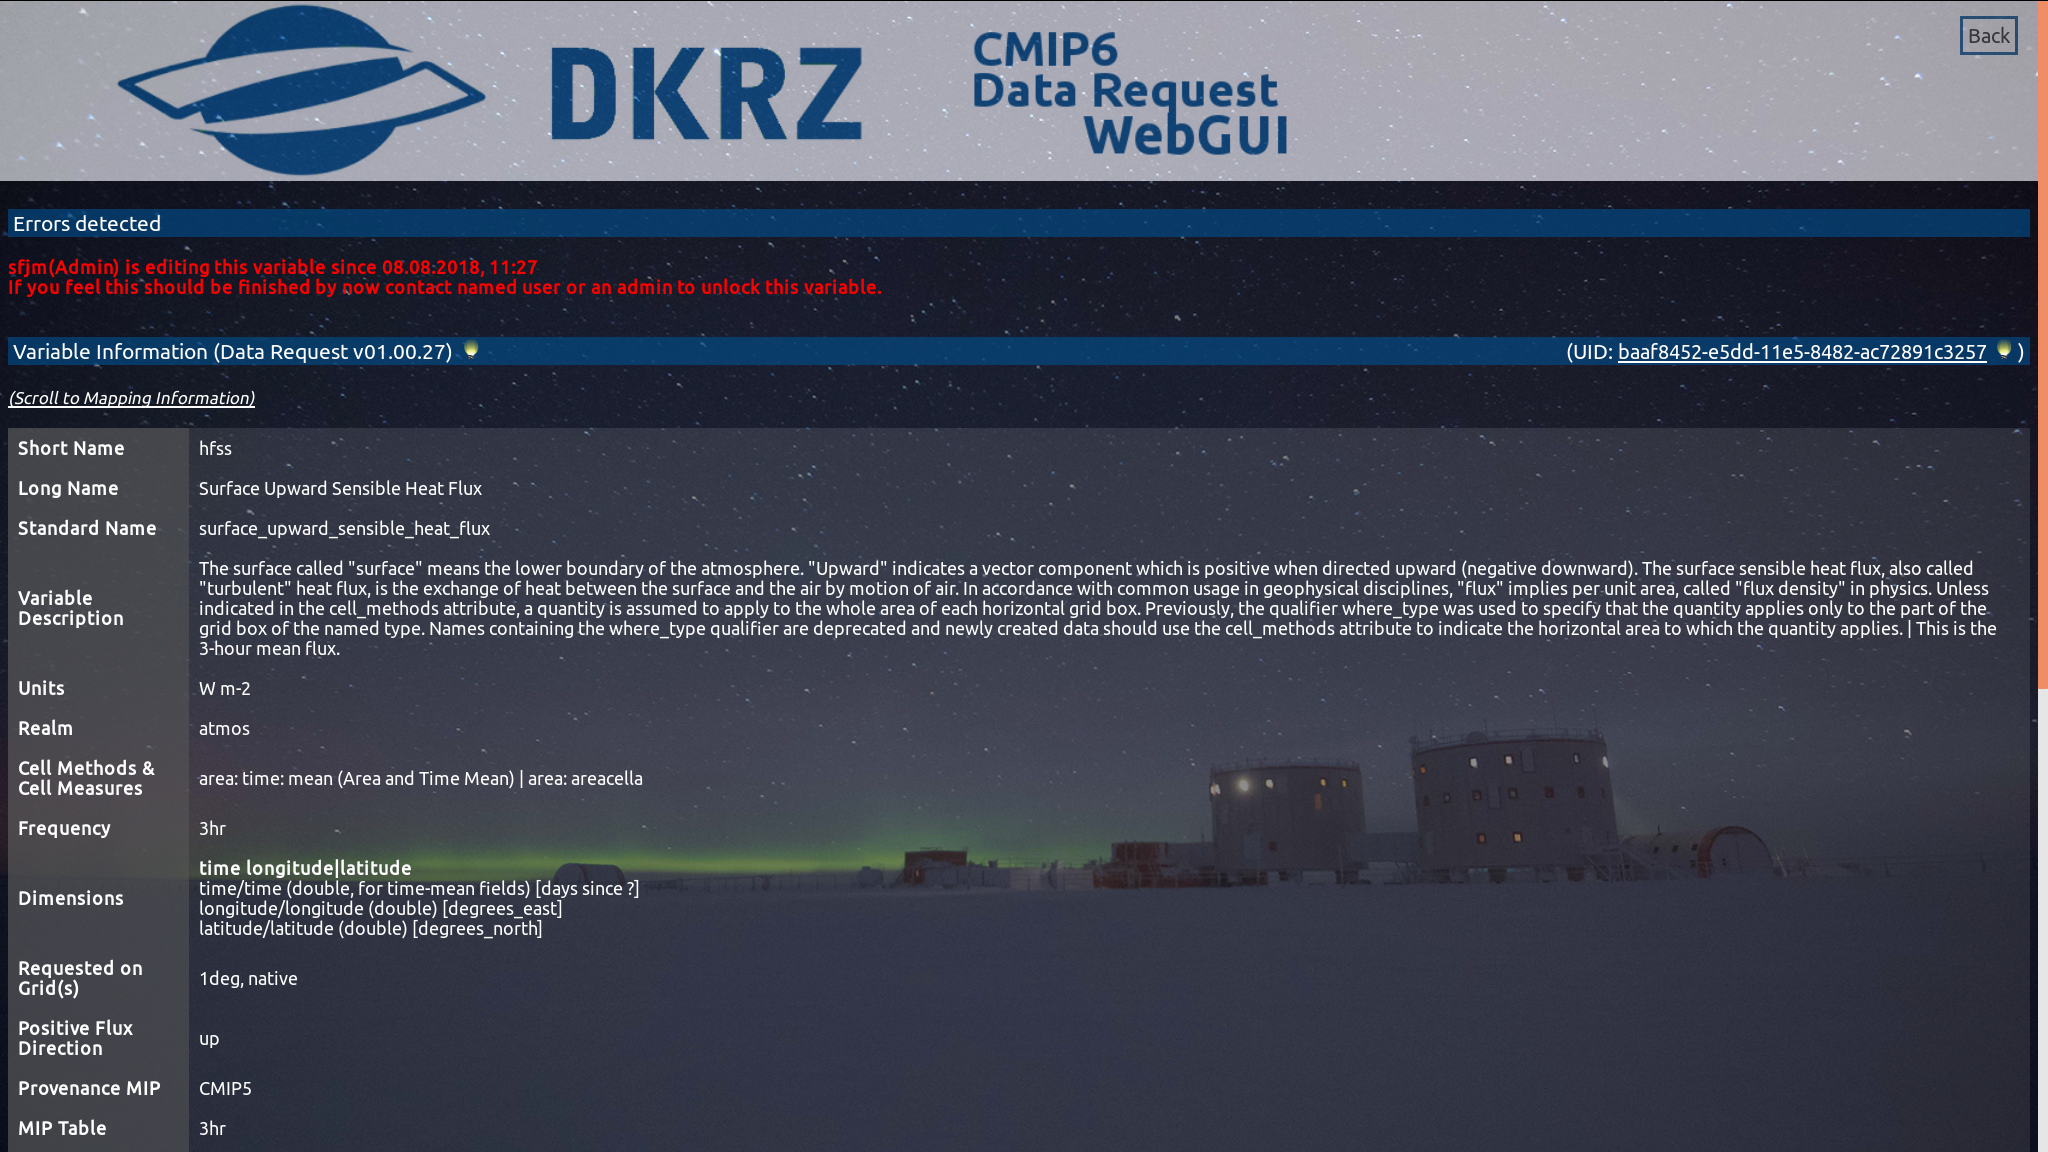
Clicking on an 'Info' button will lead to an error message on the top of the variable's editing view. You cannot edit this variable, but the currently submitted 'Variable Mapping Information' and the 'Variable Information' are shown as usual.
24 / 26
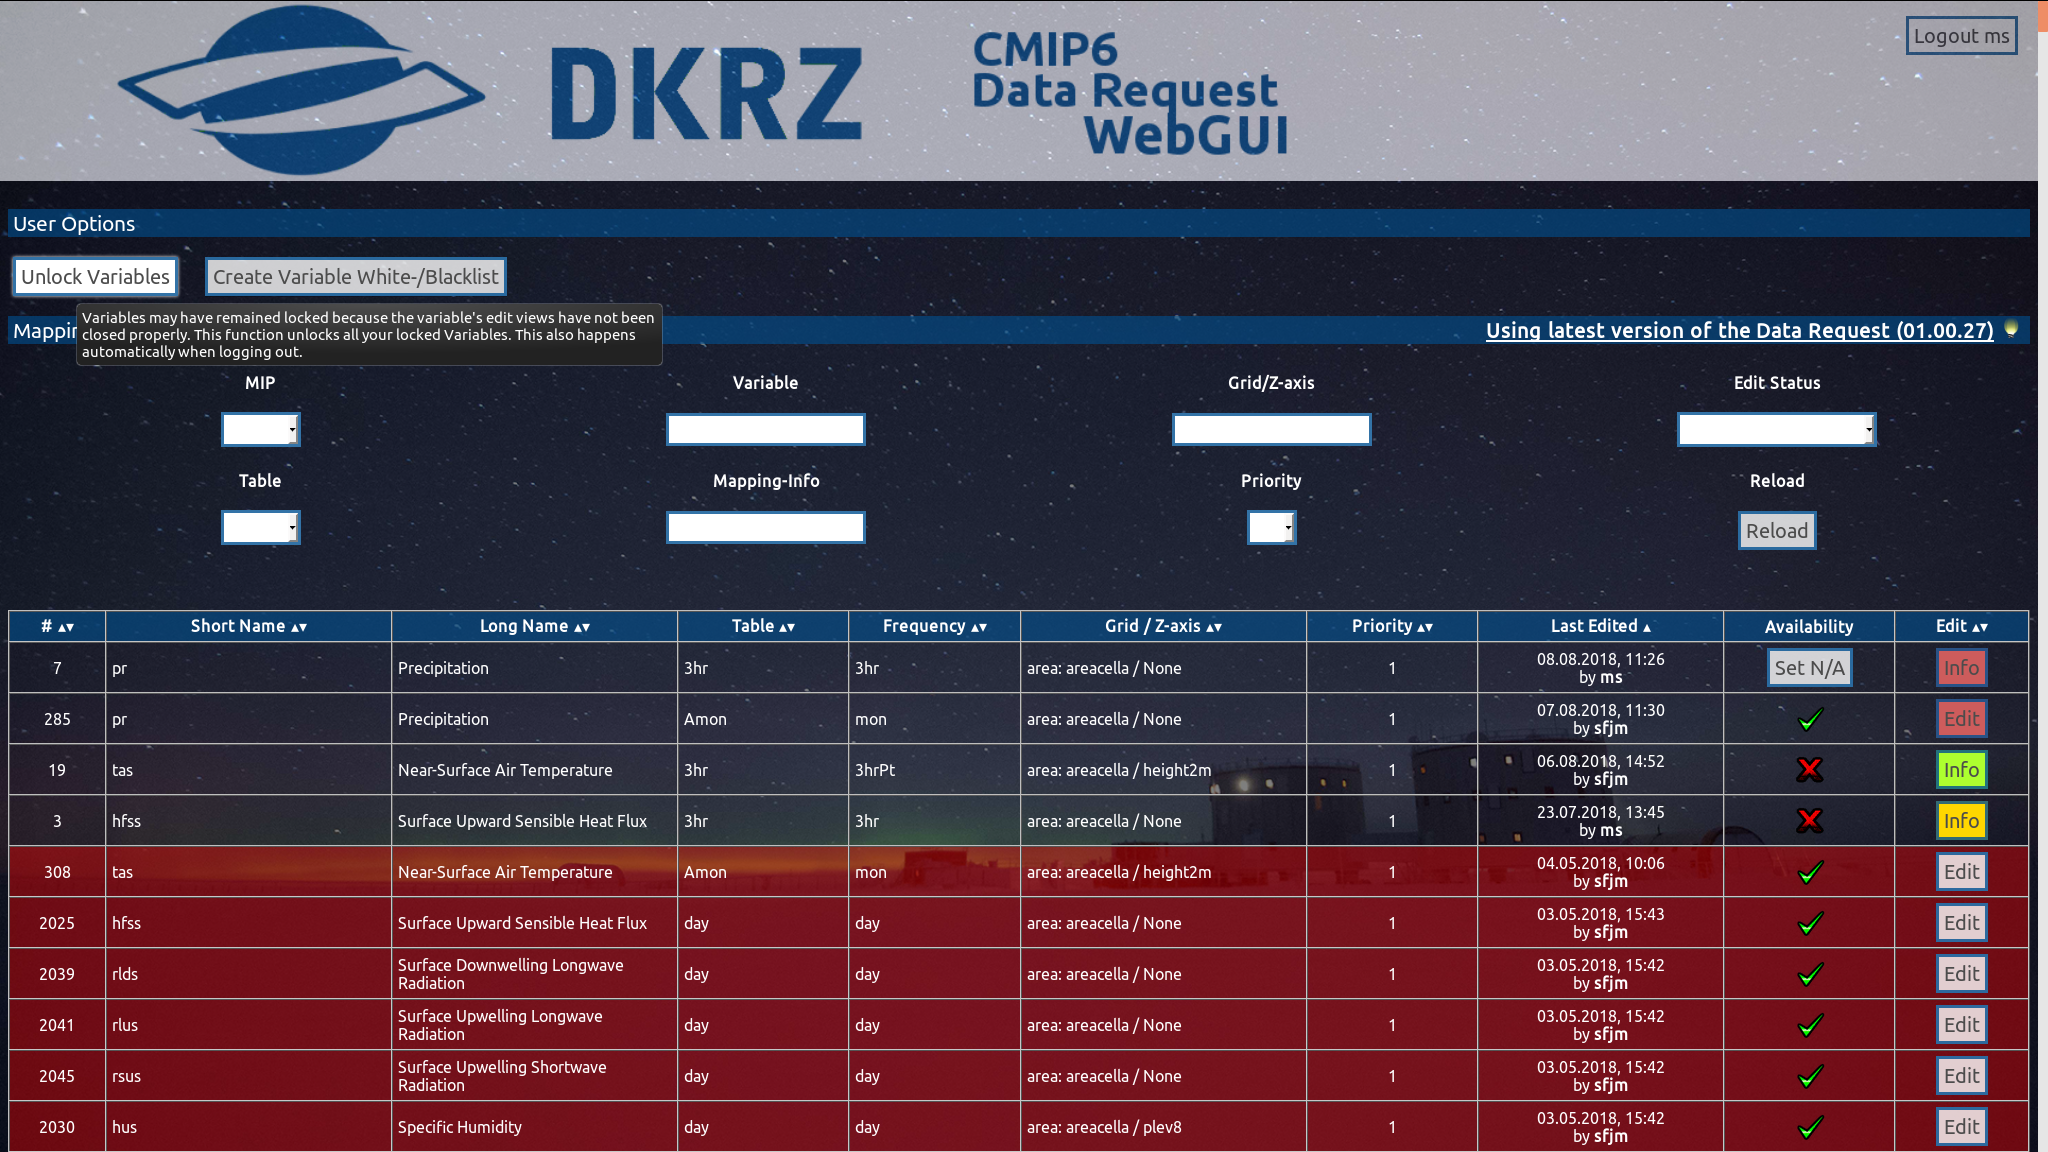
To unlock your locked variables (if you forgot to click the 'Go Back' button in the variable's editing view), you can simply 'Logout' or click on 'Unlock Variables'. Or you click on the red 'Edit' button to continue editing this variable. Admins have additional options available to unlock and lock variables either in the 'Table View' or in the 'Edit View'.
25 / 26
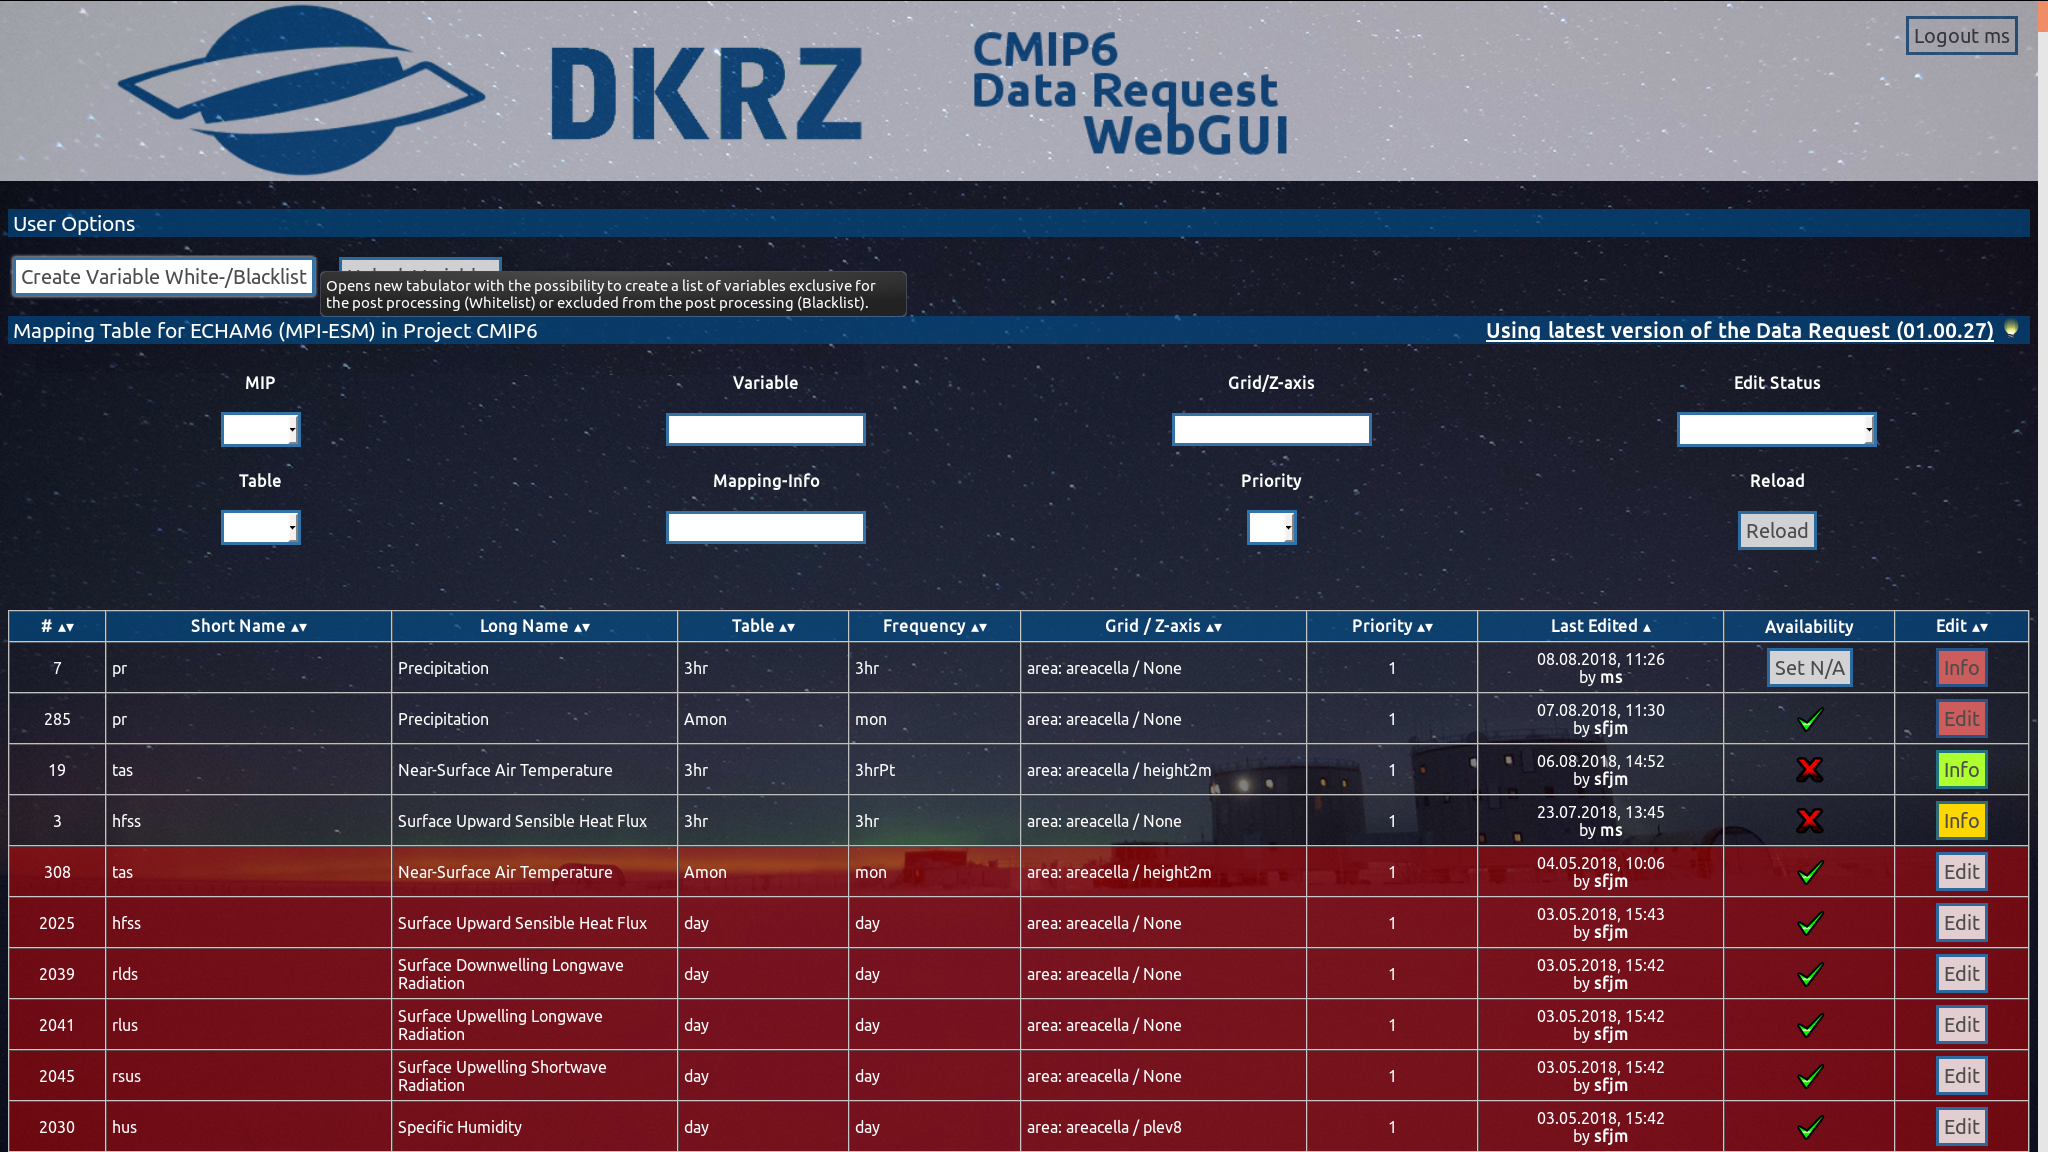
The aim is to automatically create scripts out of the variable mapping information. Variables that are marked as available in the model will be included in this scripts. To exclude variables the user has the possibility to create a Black- or Whitelist, which can be applied later when creating the scripts. Variables from the Blacklist will be excluded, variables from the Whitelist will be exclusively part of the post processing, when the list is being applied. See the PostProcessing HowTo for more information.
26 / 26
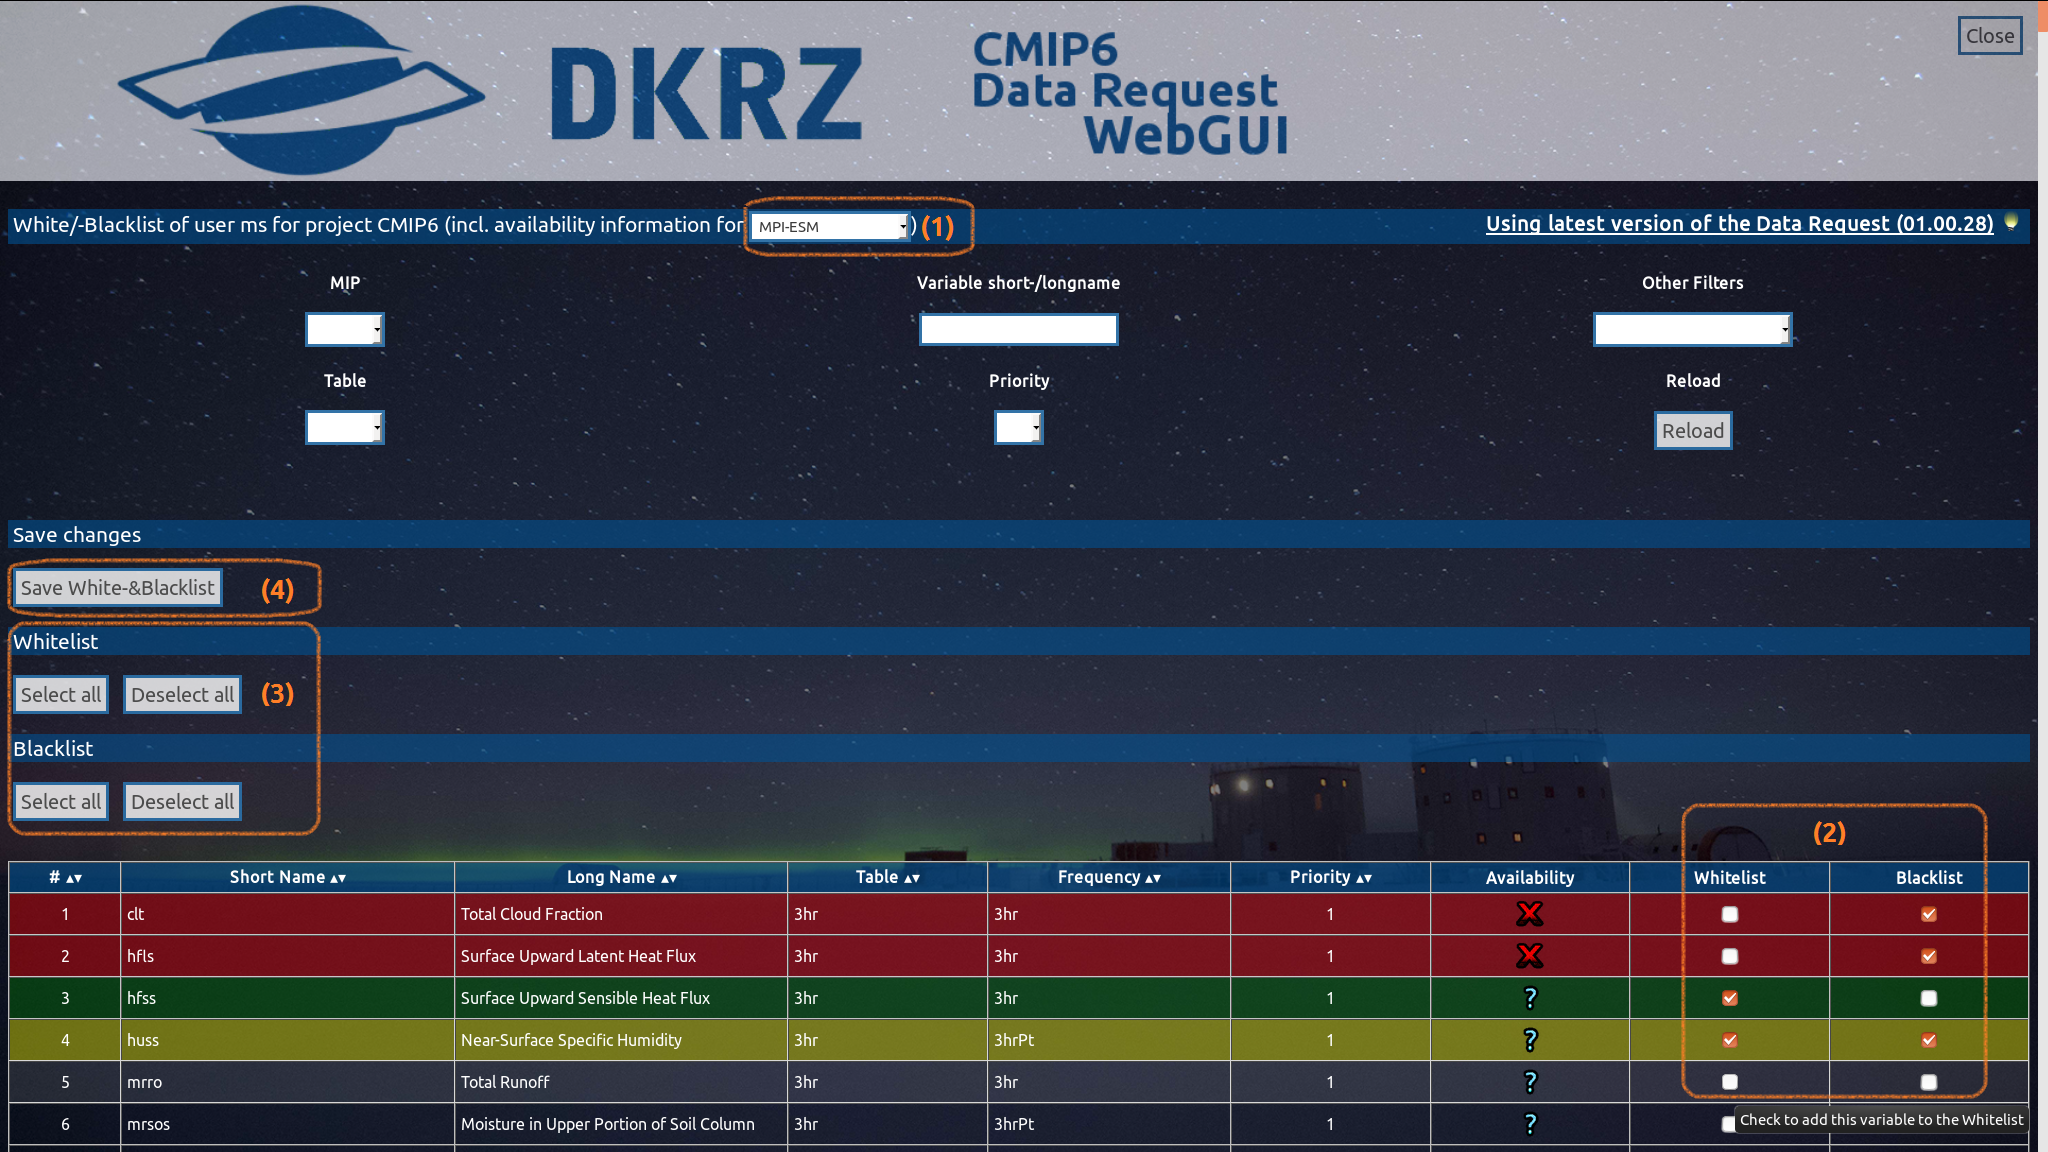
The view is similar to the table view with filters allowing to narrow down the list of variables to the desired one(s). Availability information however is displayed for an entire model and not just a single submodel. The model can be selected at (1). Variables can be added to the lists by marking the checkbox (2). All displayed variables can be selected / deselected by using the buttons under (3). When all selections have been made the list has to be saved using the button 'Save White-&Blacklist' (4).